Graduation Party Decor DIY Crafts can turn a simple backyard gathering into a warmly memorable celebration without a big budget. Bright colors, soft lights, and small handmade touches bring a playful, personal feel that guests often notice first.
This collection focuses on approachable, hands-on decor ideas that fit a wide range of styles and themes for a graduation party.
A few of these Graduation Party Decor DIY Crafts came from nights of last-minute flair and shared laughter, moments when quick creativity made the celebration feel closer and more cheerful.
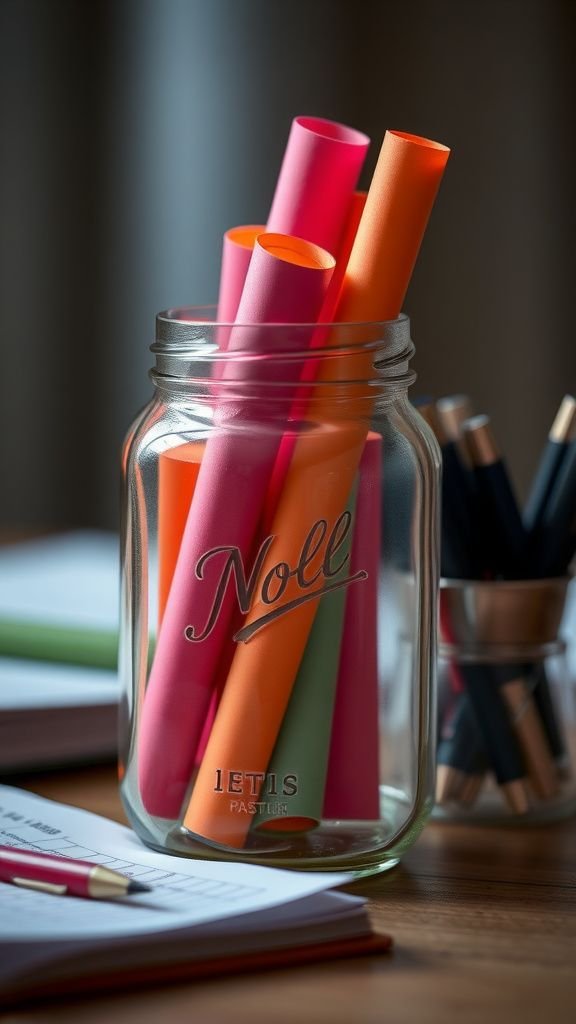
Mason jar candle centerpiece with greenery
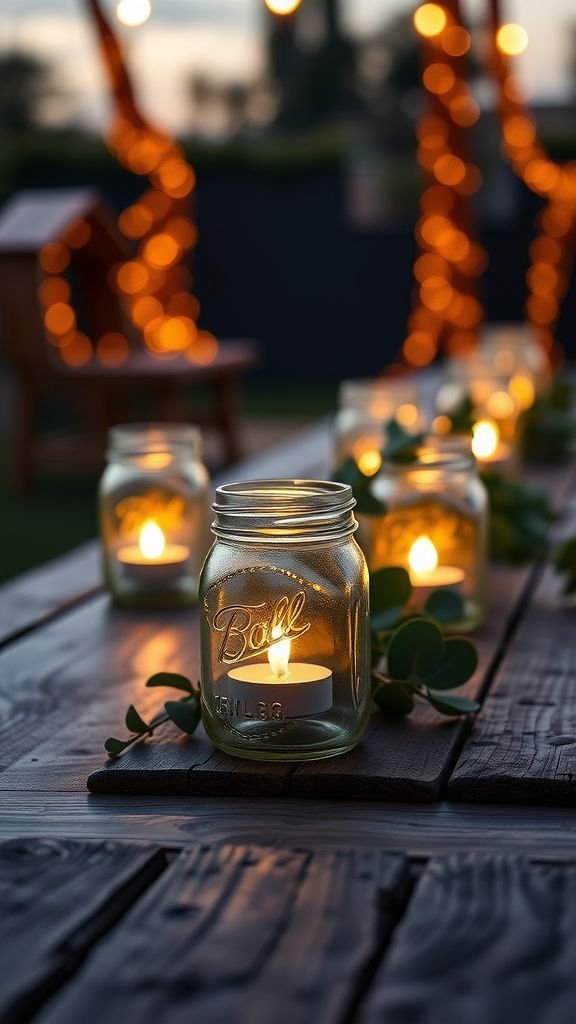
Mason jars glowing with warm light feel instantly familiar and cozy. When lined along a long table they create a low, intimate shimmer that softens harsh summer evenings.
The glass catches the flame, sending tiny reflections across nearby plates and napkins. A faint scent of wax mixes with fresh-cut greenery, and hands brushing past ferns or eucalyptus leaves leave a cool whisper against the fingers.
The whole setup invites slow conversation and the kind of relaxed atmosphere that keeps people lingering after dessert.
Steps
- Gather clean mason jars, battery-operated tealights, sprigs of greenery, and ribbon or twine.
- Place a tealight inside each jar and gently nestle a few greenery sprigs around the light, arranging them until the look feels balanced.
- Tie ribbon or twine around each jar neck for a finished touch.
- Arrange jars down the center of the table with small gaps for a staggered glow.
String of photo memories for a nostalgic vibe

A string of candid photos creates a gentle timeline that guests enjoy scanning. Old snapshots and recent selfies mingle, edges slightly curled from handling, and tiny clothespins add a casual, handmade touch.
Light catches the glossy faces and familiar smiles in different ways depending on the angle, and that mix of grainy film shots next to crisp digital images feels oddly comforting. This display tends to spark quiet stories, with friends pointing to a particular picture and laughing at the shared memory it brings back.
Steps
- Collect printed photos in a mix of sizes and finishes for varied texture.
- Cut a length of twine or thin rope and hang it across a wall or between two anchor points.
- Attach photos along the line using small clothespins spaced to create gentle curves.
- Add small fairy lights intertwined with the twine for evening ambiance.
Paper tassel garland in school colors
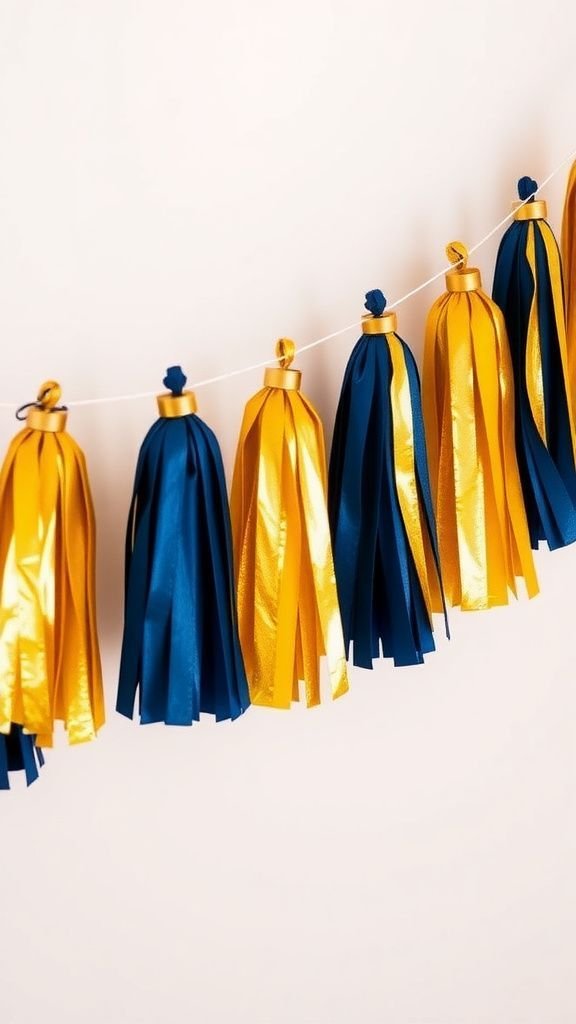
Soft paper tassels swinging on a simple cord add playful motion to a room. Each tassel brushes its neighbor, resulting in a rhythmic rustle that brings a sense of movement to otherwise static decor.
The colors in the tassels catch light differently; matte hues absorb warmth while metallic fringes reflect specks of light. The overall effect feels celebratory without overwhelming, like subtle confetti that never quite settles.
Guests often reach out to touch a tassel, amused by the feather-light texture and the gentle sound when they sway.
Steps
- Select tissue paper and a long length of twine or cord in matching colors.
- Stack sheets of tissue, fold them accordion-style, and snip fringe along one edge to form tassels.
- Roll each fringed section around itself and secure the top before sliding them onto the cord.
- Space tassels evenly along the cord and hang the garland where it will move slightly in the breeze.
Number balloon cluster with weighted base
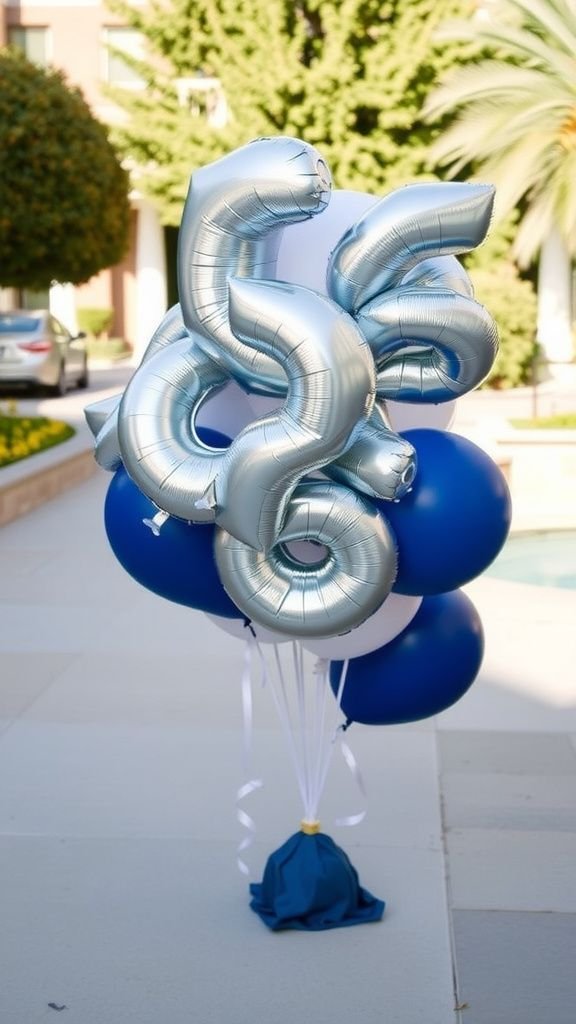
Shiny number balloons have a celebratory presence that draws the eye from across a yard. Their reflective surfaces catch the sky and surrounding colors, creating little mirrored scenes on curved foils.
When clustered, the combination of round and angular shapes adds visual interest, and the quiet tug of the helium gives them an anticipatory energy, as if they might lift away. The weighted base often carries a ribbon tail, which flicks gently in passing breezes and adds a final whimsical detail to an otherwise bold statement.
Steps
- Inflate foil number balloons with helium and tie each one securely with curling ribbon.
- Create a cluster by grouping several numbers and complementary plain balloons at different heights.
- Anchor the cluster to a decorative weight, wrapping ribbon tails neatly around the base.
- Position the cluster near the entrance or a focal wall for maximum visibility.
Confetti-filled clear balloons for playful sparkle

Transparent balloons speckled with confetti create an air of cheerful surprise. The paper dots inside flutter against the inner sides when air shifts, catching light at different angles and sending tiny specks of color across nearby surfaces.
Each balloon has a soft, elastic tension that gives a pleasant, slightly springy feel when brushed. The overall effect looks festive without being loud, like a steady snowfall of color trapped in glass.
Guests often smile when a confetti dot drifts into view, as if the decoration itself is winking.
Steps
- Prepare a collection of clear balloons and small circles of confetti in coordinating colors.
- Insert confetti into each balloon opening before inflating, aiming for an even spread inside.
- Inflate balloons to a medium size to keep confetti visible along the sides.
- Tie ribbons to the ends and anchor them or let them float for a light, airy display.
Diploma scroll favors with ribbon and tag
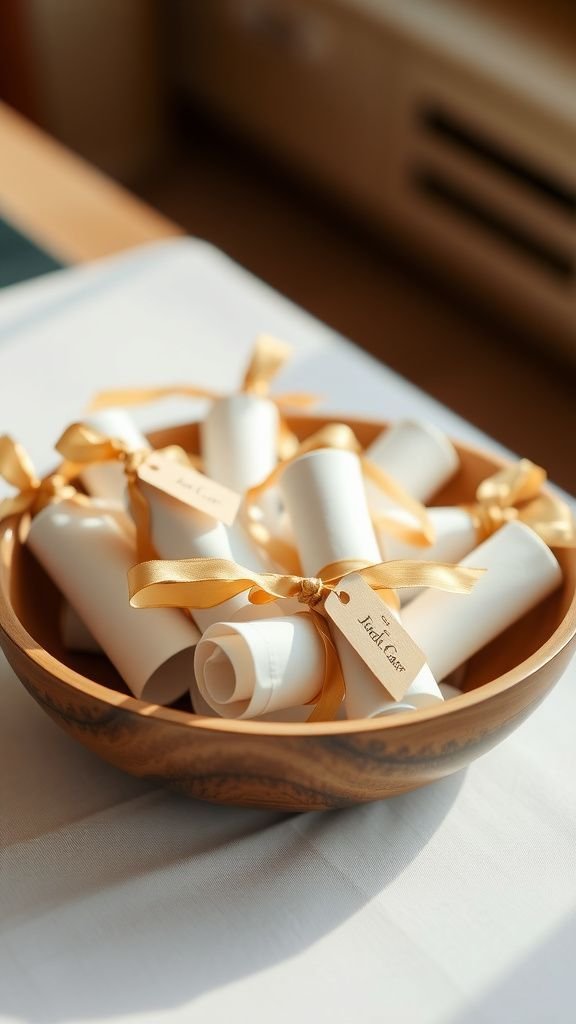
Tiny rolled scrolls suggest a playful echo of the big day, a miniature keepsake that feels ceremonious. The paper carries a slight stiffness and a little crackle when unrolled, and satin ribbon ends glint at the edges.
A small tag with a handwritten name adds a personal whisper, sparking small smiles as guests read their own. The tactile element of untwisting the ribbon and feeling the paper’s texture gives the favor a small, pleasant ritual that guests replay when they glance at their place setting later on.
Steps
- Cut paper into uniform rectangles and write or print short messages or names if desired.
- Roll each rectangle tightly into a small scroll and secure with a short length of ribbon.
- Thread a small tag onto the ribbon before tying to identify each guest.
- Place the scroll favors at each place setting or in a decorative bowl for guests to take.
Cap-shaped cupcake toppers with playful flair

Tiny mortarboard toppers perched on cupcake peaks carry a wink of ceremony and a lot of charm. Textured cardstock contrasts with fluffy frosting, and the small tassel adds a delicate thread of movement whenever a plate is lifted.
The balance between sweet and celebratory feels both festive and slightly tongue-in-cheek, which often sparks light conversation. The sight of a dozen little hats in a cluster makes for an appealing centerpiece on its own, and frosting smudges nearby only enhance the feeling of an event well enjoyed.
Steps
- Cut graduation cap shapes from sturdy cardstock and create small tassels from thin thread.
- Attach tassels to the cap tops with a small adhesive tab or dot.
- Insert a toothpick or short skewer into the underside of each cap for stability.
- Press each topper gently into the center of freshly frosted cupcakes.
Tissue paper pom-pom ceiling cloud clusters

Clusters of fluffy pom-poms suspended overhead feel like playful clouds that soften the room. They create pockets of shade and whimsy, and each pom’s layered edges catch light in gentle gradients.
Walking beneath them inspires a small smile as strands of paper whisper against one another with the tiniest movement. The visual weight is light but noticeable, turning any ceiling into a cozy canopy that frames the celebration.
Guests reclining on chairs or leaning against railings often glance up, commenting on the soft, cloudlike mood above.
Steps
- Layer sheets of tissue paper and gather them into loose bundles to form pom-poms.
- Secure the center tightly and gently pull each sheet toward the middle to create fullness.
- Attach a string to each pom-pom and suspend them from the ceiling at varied heights.
- Group several pom-poms together to create cloud-like clusters over seating areas.
Hand-lettered chalkboard signs for directions

Chalkboard signs bring a casual, crafted voice to a party, their matte black background making white and colored chalk pop. The handwritten strokes have a slightly imperfect charm, with faint smudges and the occasional thicker line where pressure varied.
When placed at an entry or near food tables they read like friendly notes, and guests often lean in to read the playful wording. The scent of chalk dust lingers faintly, and the texture of chalk on slate invites a closer look, as though someone had just paused mid-sentence.
Steps
- Select small chalkboards or chalkboard-painted frames suitable for tabletop or easel display.
- Sketch the message lightly with a pencil or chalk marker before filling in bold strokes.
- Add small decorative flourishes like stars or laurel leaves to complement the main text.
- Position signs where guests will naturally glance, such as the entrance or food area.
DIY photo booth frame with playful props
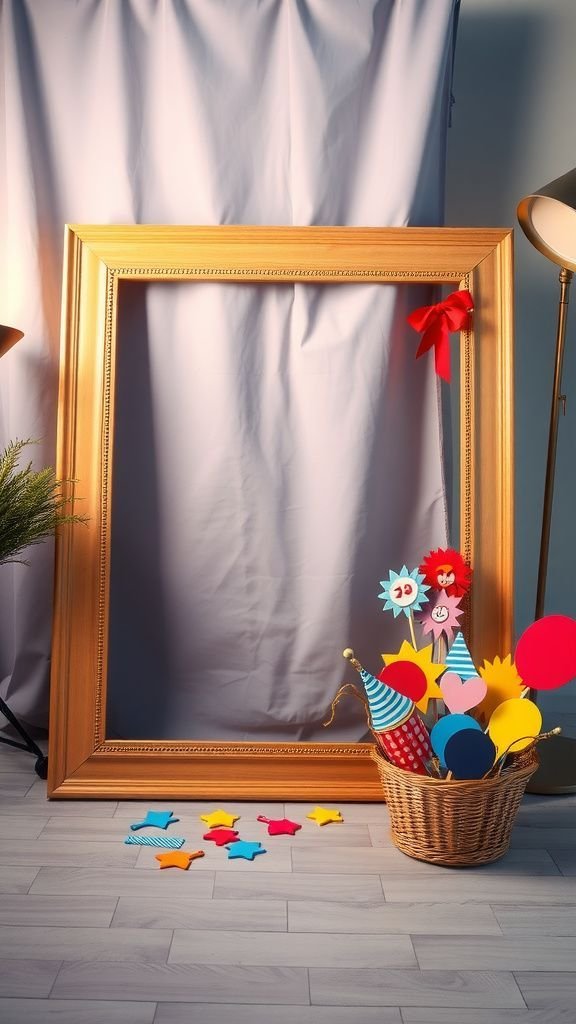
A large handmade frame invites guests to step into a moment, and when propped against a wall it encourages spontaneous silliness. The texture of the frame’s material contrasts with shiny party props like glittered glasses, making each photo look intentionally fun.
Props sit nearby in a basket, their bright colors and bold shapes immediately readable even from a distance. There is a relaxed energy as people gather, quick laughter and the click of the camera blending into the background.
The resulting images often become little stories retold long after the party.
Steps
- Create a large rectangular frame from foam board or lightweight wood and decorate its edges with themed embellishments.
- Set up a neutral backdrop behind the frame to keep focus on faces and props.
- Gather an assortment of playful props and place them within reach for guests.
- Position the frame at a comfortable height and label with a small sign inviting photos.
Paper rosette wall for a textured backdrop
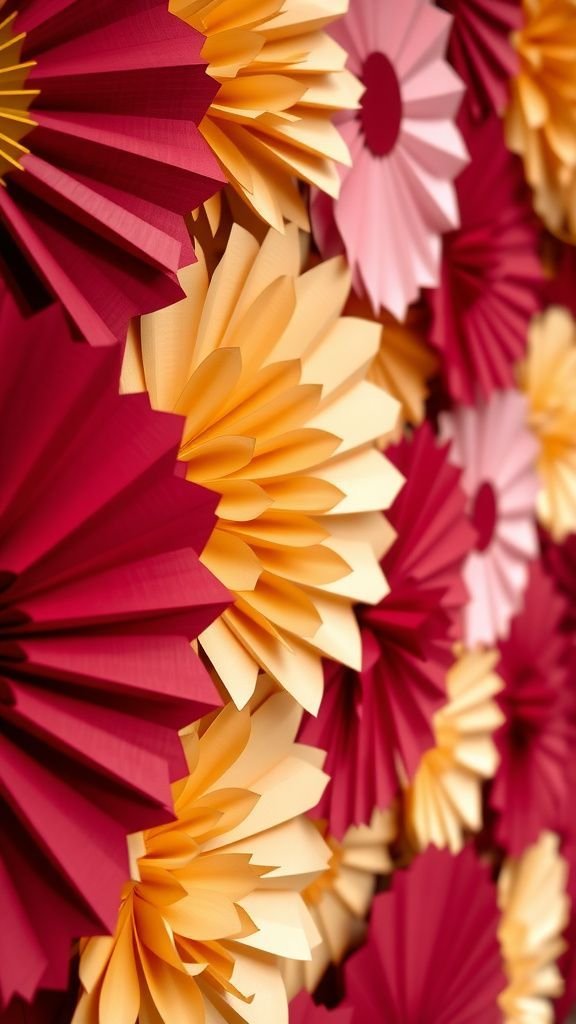
A wall of layered paper rosettes forms a tactile backdrop that reads as both casual and thoughtfully arranged. Each rosette opens like a tiny flower, their ridged edges casting soft shadows that shift with the light.
The mix of matte and slightly glossy papers creates subtle contrast, and overlapping pieces feel like a patchwork of celebration. When nearby conversations hum, the backdrop acts as a visual anchor, drawing eyes and offering a pleasant spot for photos.
It gives a handcrafted flair that often invites compliments and second glances.
Steps
- Prepare a variety of paper rosettes in coordinated colors and sizes by folding and securing circular strips of paper.
- Arrange the rosettes on a large board or directly on a wall surface, starting with larger pieces to anchor the composition.
- Layer medium and small rosettes in the gaps to build a full, textured surface.
- Stand back and adjust placement for balance before final attachment.
Glittered foam letters spelling out graduate’s name
Large foam letters coated in shimmering glitter command attention without overwhelming the space. The sparkle catches and scatters light in tiny points, creating a playful twinkle that shifts with footsteps.
Letters resting on a mantel or propped on crates feel both celebratory and personal, especially when they spell out a name or class year. The tactile contrast between gritty glitter and smooth foam invites a curious touch, and the visual rhythm of spaced letters lends a sense of measured excitement to the room.
Steps
- Trace or purchase foam letters in the desired font and size appropriate for the display area.
- Apply an adhesive layer to the front of each letter and sprinkle glitter evenly to achieve full coverage.
- Shake off excess glitter gently and allow letters to dry fully on a protective surface.
- Arrange the letters on a shelf, table, or against a wall so they spell the chosen name or message.
Ribbon curtain doorway for a festive entrance
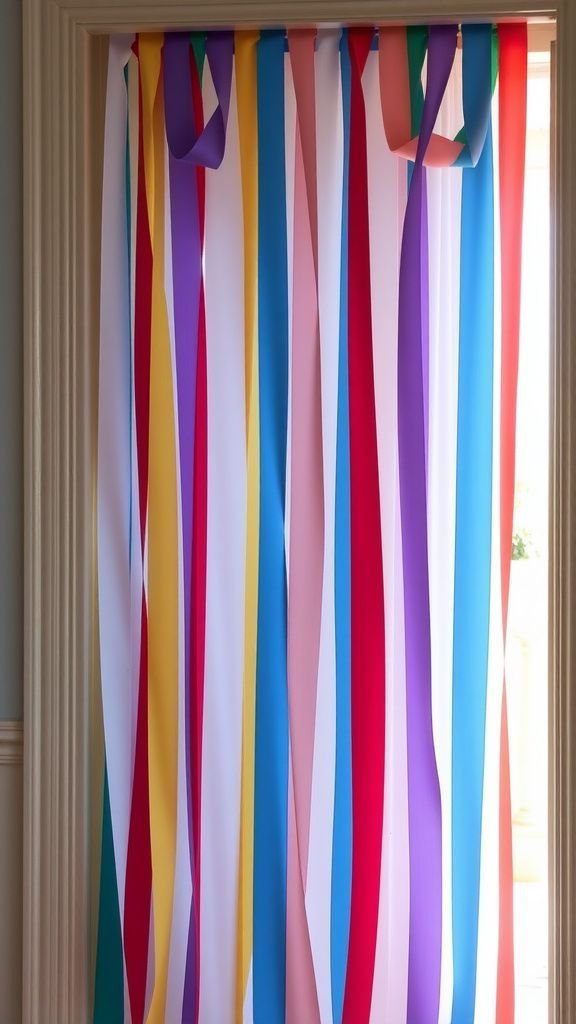
A cascade of ribbons makes an entrance feel like an invitation, each strip catching the light and swaying slightly with foot traffic. The ribbons’ varied textures and widths create a layered fringe that sounds faintly as people pass through, a delicate whisper of celebration.
Colors blend together in motion, forming new pairings with each step. The curtain frames the transition from outside to party in a way that feels playful and welcoming, encouraging guests to pause and take that small, theatrical stroll into the festivities.
Steps
- Choose an assortment of ribbons in complementary colors and textures and cut them into long lengths.
- Secure a strong header ribbon or rod above the doorway and fold each ribbon over the header to affix it.
- Space ribbons evenly to create a full curtain effect and trim ends for uniform length.
- Test the curtain by passing through to ensure comfortable movement and visual appeal.
Graduation cap garland with tiny mortarboards
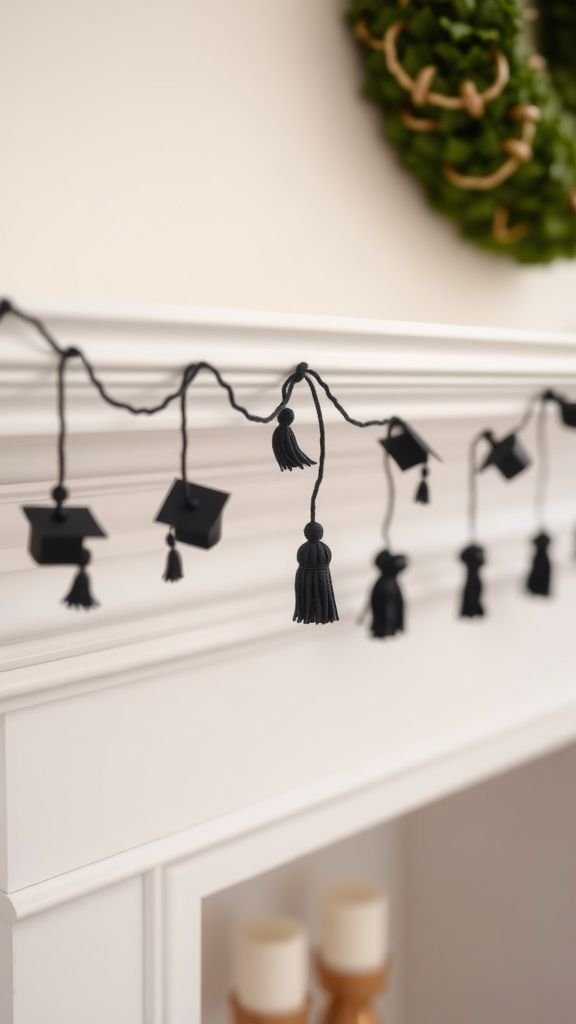
A garland of miniature mortarboards carries a lighthearted nod to tradition. The stiff caps and dangling tassels produce a mix of structured form and delicate detail that reads as both formal and fun.
Strung across a mantel or above a dessert table, the repetition of tiny hats creates a rhythmic motif that ties the event to its central theme. People often comment on the charm of seeing a familiar symbol rendered in small scale, and the little tassels catch pockets of light as they sway in a subtle breeze.
Steps
- Cut small squares of cardstock to form the mortarboard tops and create matching square bases.
- Attach a short tassel to each cap and fasten the top and base together for a finished look.
- Thread a length of twine through each tiny cap or tape them securely along the back as you string the garland.
- Hang the garland across mantels, stair railings, or dessert tables where the theme will be visible.
Framed collage of achievements and tickets
A framed collage of little artifacts—programs, ticket stubs, small certificates—reads like a compact story board of accomplishment. Textures vary from glossy paper to thin cardstock, and handwritten notes peek out between the layers.
The collection feels intimate, prompting guests to pause and trace the timeline of events with their eyes. When hung near the reception area it invites curiosity without demanding attention, and it often becomes a quiet conversation starter as friends point to a familiar logo or scribbled annotation that evokes a shared moment.
Steps
- Collect memorabilia such as programs, small certificates, ticket stubs, and personal notes to include in the collage.
- Arrange items on a backing board within a large frame, playing with overlapping layers and texture contrasts.
- Secure pieces with archival corners or acid-free adhesive and close the frame.
- Display the framed collage in a prominent spot where guests can admire the personal history.
LED jar lanterns for a soft evening glow
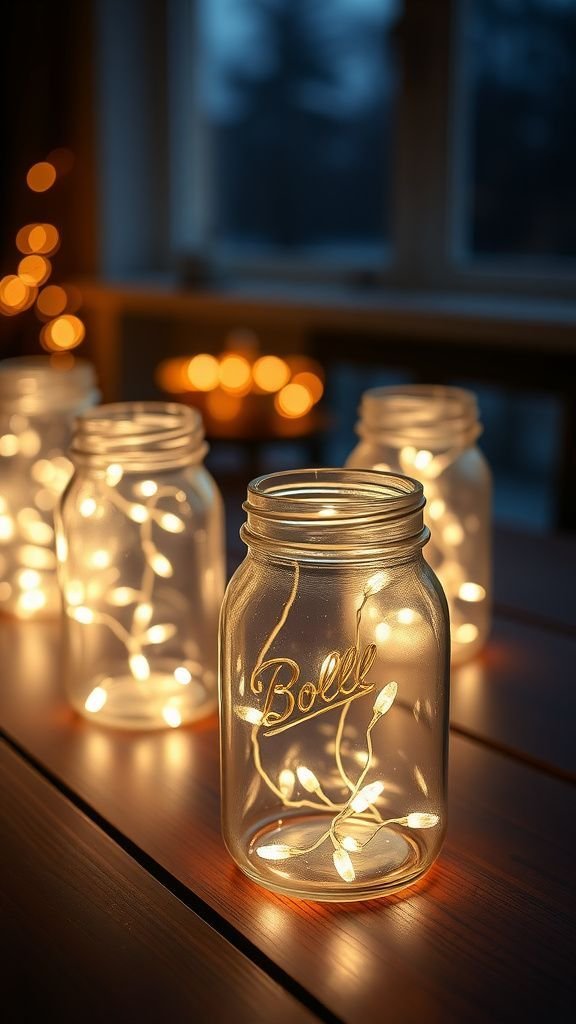
Jars filled with tiny LED lights cast a steady, gentle glow that reads as cozy and welcoming. The lights create specks of warm color that reflect inside the glass, producing a layered shimmer that feels calm.
Glass textures add subtle refractions, and lids with punched patterns send delicate starbursts across nearby surfaces. The lack of flame brings a quiet reassurance, and the cool touch of glass contrasts pleasantly with the surrounding nighttime air.
These lanterns become islands of calm light that guide movement and invite lingering conversation.
Steps
- Gather clear jars of varying sizes and strings of small LED fairy lights or battery-operated tea lights.
- Place lights inside each jar, arranging cords neatly and hiding any battery packs at the bottom.
- Replace lids and punch decorative holes if desired to cast patterns, or leave jars open for a softer glow.
- Scatter lanterns across tables or along pathways for ambient evening lighting.
Color-coordinated place cards with tassel detail
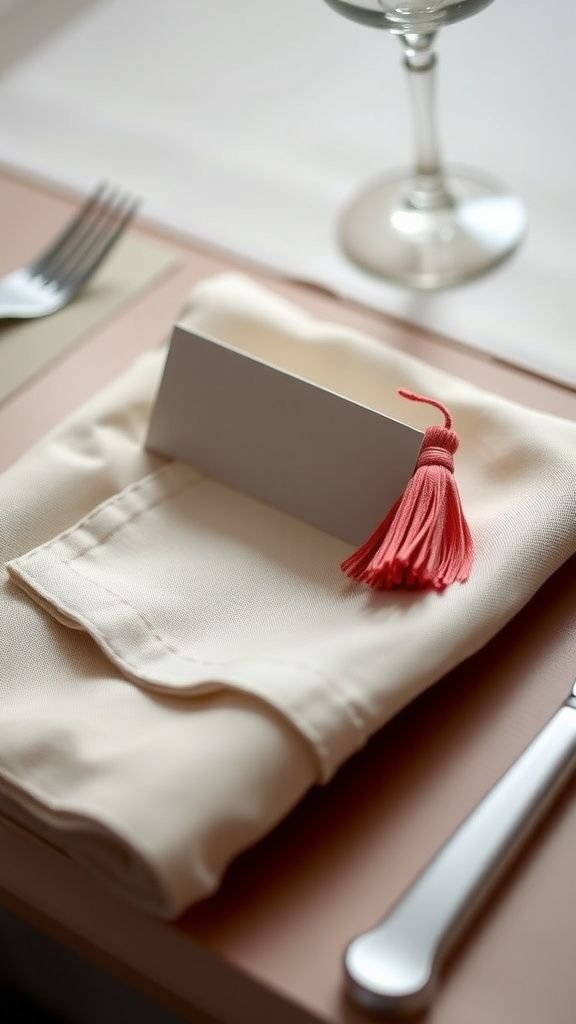
Place cards in coordinating hues lend a tidy, considered look to each spot at the table. The cardstock’s weight gives a reassuring heft, and the small tassels introduce a playful thread of texture that dangles just so.
Handwritten names carry a personal touch, with the pen strokes adding subtle personality to each setting. The visual rhythm of repeated cards creates a composed scene that frames the meal, and guests often tuck their card into a napkin or glance back at it when returning to their seat after mingling.
Steps
- Cut cardstock into uniform rectangles and match each to a chosen color palette for coherence.
- Write guest names with a fine-tip pen, adding small decorative elements if desired.
- Attach a tiny tassel or ribbon to each card corner for a decorative accent.
- Place cards at each setting or near napkins so they are easy to spot upon seating.
Memory jar where guests leave short notes
A communal jar for notes becomes a quiet repository of warmth and well-wishing. Slips of paper flutter as they are added, each one carrying a different handwriting style and ink shade.
Some notes are brief and playful, others earnest and warm, and together they form a layered archive of the night’s small moments. The jar’s transparent sides reveal colorful stacks of paper rising, an encouraging visual that invites more contributions.
Later, the pile becomes a tactile reminder that the celebration was filled with thoughtful attention and shared affection.
Steps
- Provide a large clear jar or vase and a stack of small, colorful paper slips for guests to write on.
- Set out pens with different ink colors and a small sign explaining the concept so guests know where to leave notes.
- Encourage guests to fold or roll their notes before dropping them into the jar.
- Keep the jar in a central spot so it fills visibly as the event progresses.
Bottle cap garland with metallic accents
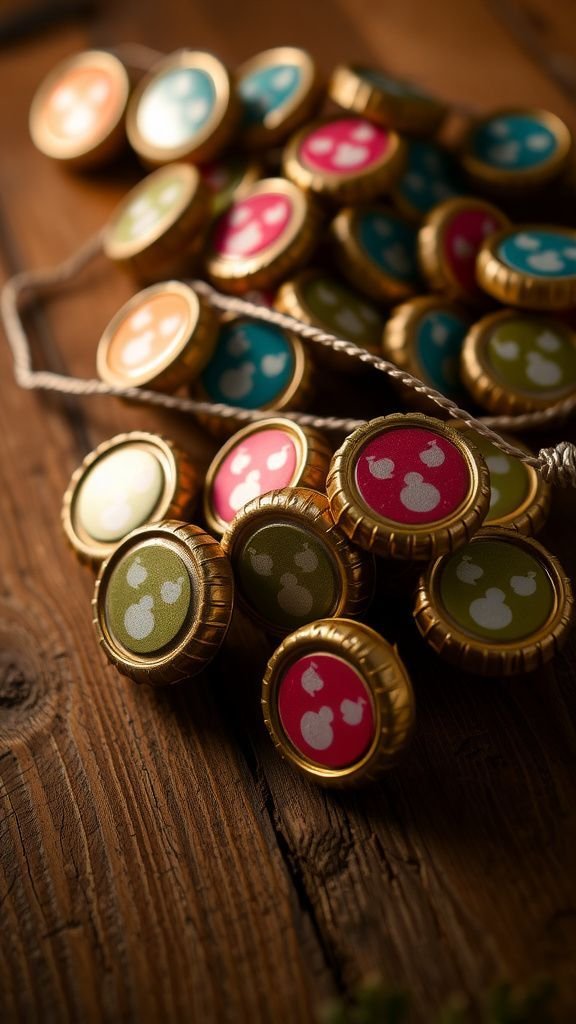
A garland of decorated bottle caps offers an eclectic, recycled touch that feels both playful and resourceful. The caps’ ridged edges catch light differently than flat materials, creating a subtle metallic shimmer.
Patterns painted or printed on the caps lend little surprise moments as the eye travels along the string. The tactile mix of metal and light string makes the garland feel handcrafted, with tiny imperfections adding character.
Hung low across a dessert table it reads like a festive ribbon with a bit of grit, an unexpected texture among softer decorations.
Steps
- Collect clean bottle caps and decorate the flat faces with paint, stickers, or printed paper circles.
- Drill or punch small holes near each cap edge and thread a durable string through them to form a garland.
- Space caps at even intervals and knot the string at each end for stability.
- Hang the garland across tabletops, shelves, or along a buffet for decorative interest.
Class year floral wreath for front door display
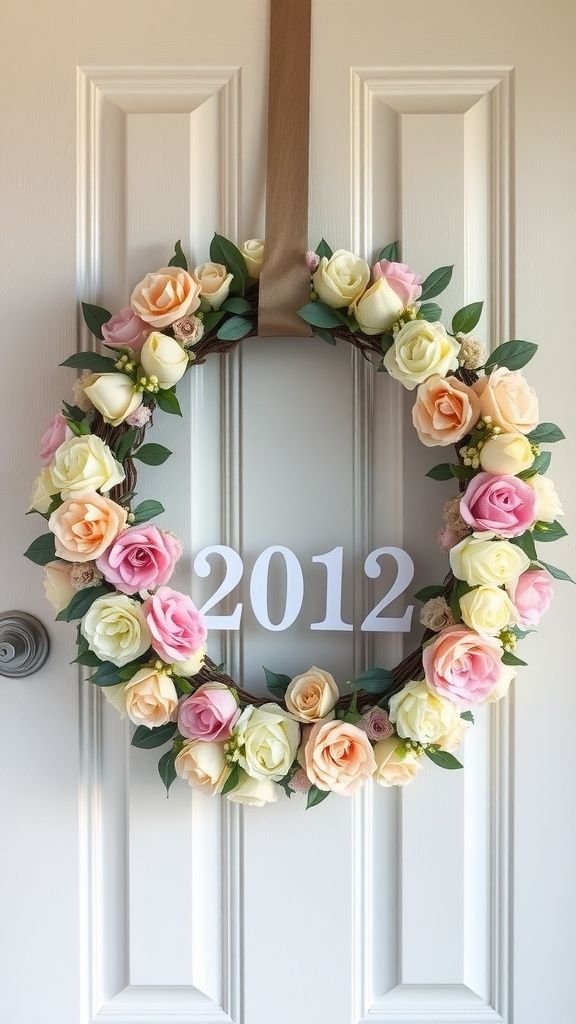
A wreath adorned with flowers and a subtle numeric accent offers a welcoming note right at the threshold. Soft petals and foliage bring a living texture that contrasts with the harder edge of the wreath base, and the number nestled among blooms acts as a gentle focal point.
The scent of fresh flowers drifts outward when the door opens, and passerby glimpses often spark a quick smile. The wreath reads as both celebratory and homely, marking the occasion in a way that feels naturally part of the home’s greeting.
Steps
- Choose a circular base and gather faux or fresh florals and greenery that match the party palette.
- Arrange the blooms and foliage around one side of the base to create a balanced, slightly asymmetrical look.
- Add a small numeric accent indicating the graduation year tucked among the flowers.
- Hang the wreath on the front door at eye level for an inviting entrance.
Paper fan table runners for layered texture
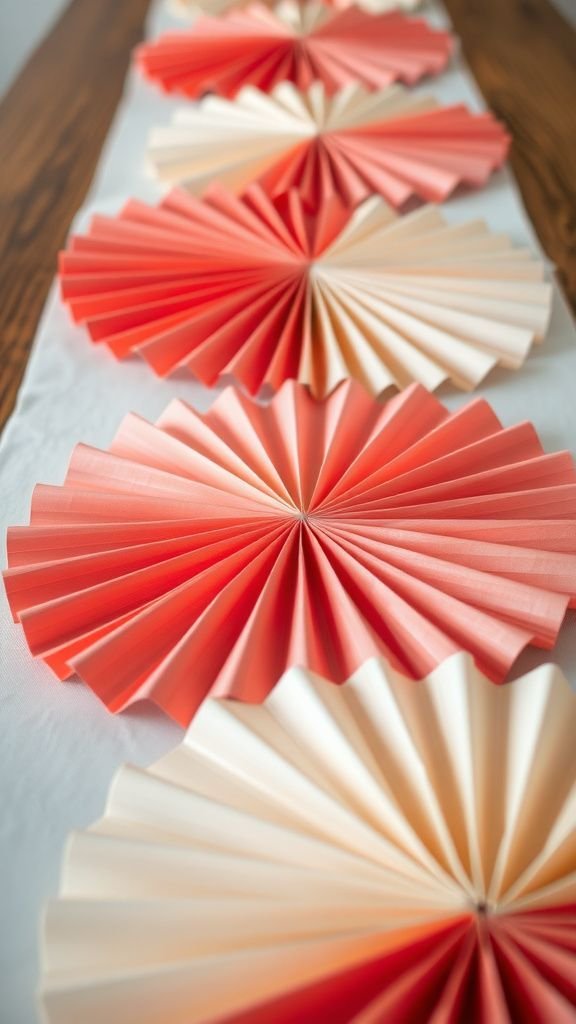
A row of overlapping paper fans creates a scalloped runner that feels both refined and playful. The fans’ radial folds cast soft concentric shadows, and alternating colors create a rhythm along the table’s length.
Textural contrast between crisp paper and smooth tableware heightens tactile interest when reaching for a plate or glass. The layered rows invite fingers to trace the ridges, and the pattern reads as festive without competing with centerpieces.
Guests often admire the neat repetition and varied hues that bring a sense of cohesion to the tabletop.
Steps
- Make or source paper fans in complementary colors and sizes to cover the length of the table.
- Lay the fans edge to edge in an overlapping pattern along the center of the table.
- Secure overlaps discreetly so the fans maintain a clean, scalloped appearance.
- Add light centerpieces atop the runner to integrate the texture into the overall tablescape.