Spring is a season of renewal, and what better way to celebrate the blossoming flowers and warming weather than with a delightful collection of spring crafts! Whether you’re looking for fun activities to do with kids, unique DIY home décor projects, or creative ways to brighten your space, these spring crafts offer endless inspiration. From colorful floral arrangements to whimsical Easter decorations, there’s no shortage of ways to channel your creativity into crafting this season. Let your imagination bloom with these easy and enjoyable spring crafts ideas!

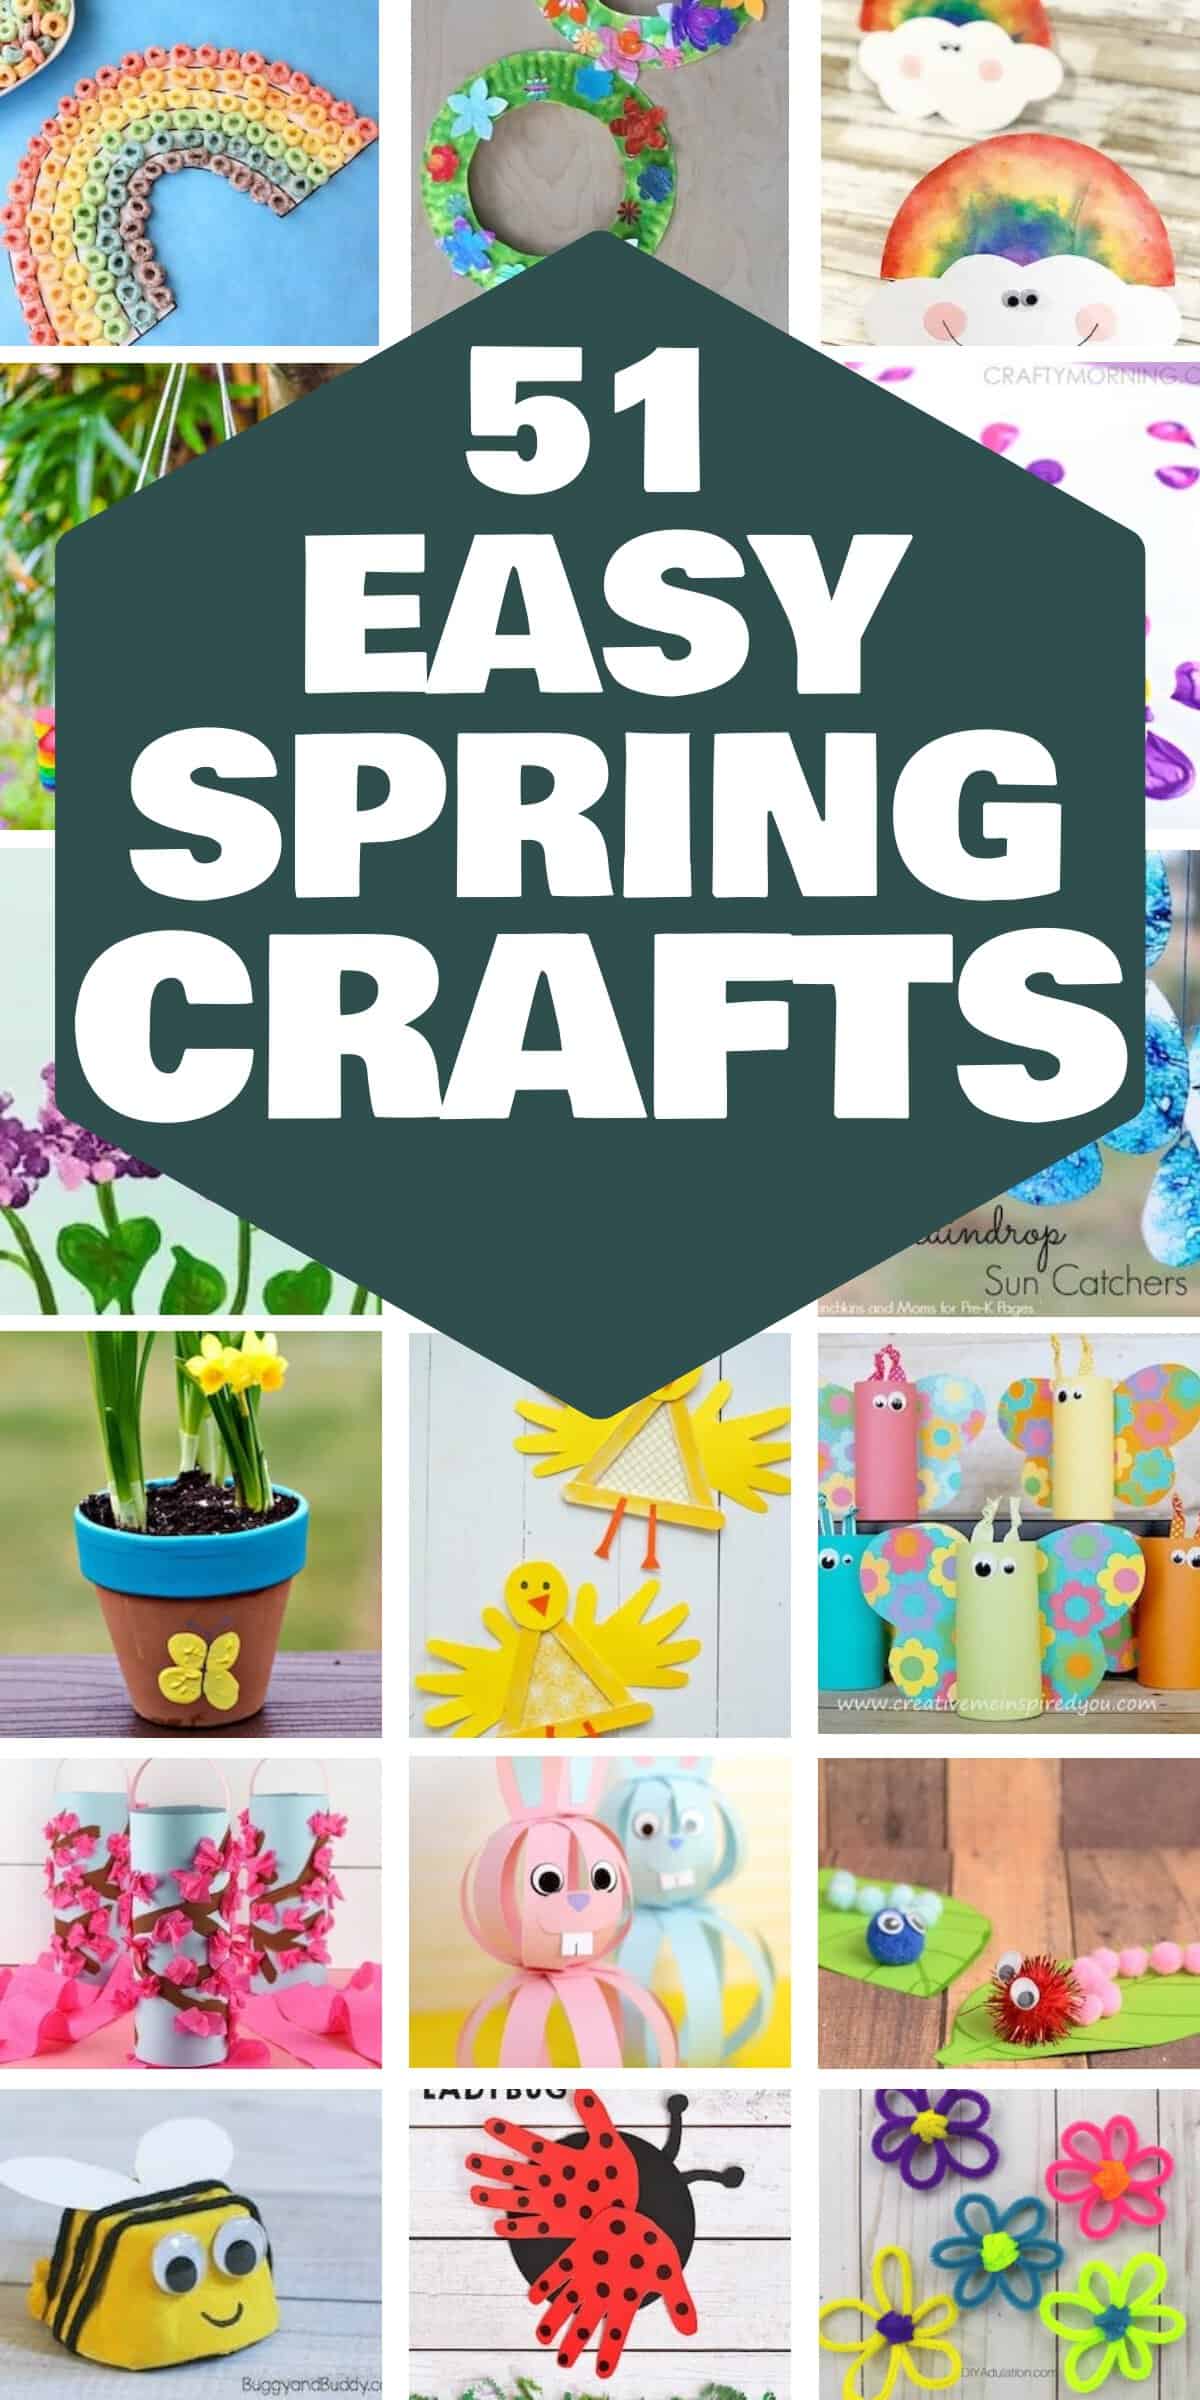
Creating spring crafts is the perfect way to embrace the beauty of the season while spending quality time with family and friends. These spring-themed crafts can range from simple paper projects for kids to intricate handmade décor that will transform your home into a springtime oasis. Whether you’re crafting adorable bunnies, pastel garlands, or upcycling old materials into vibrant garden ornaments, the possibilities for spring crafts are as fresh and exciting as the season itself.
Dive into the joy of spring crafts by exploring new techniques and materials that celebrate the essence of spring. Paint, glue, sew, or fold your way to stunning creations that embody the cheerful spirit of the season. With so many spring craft ideas available, you can make everything from personalized greeting cards to birdhouses bursting with charm. Whether you’re an experienced crafter or just starting, spring crafts are an inspiring way to welcome the season’s beauty and creativity into your life.
Incorporate Natural Elements
Embrace the essence of spring by integrating natural elements into your crafts. Use flowers, leaves, twigs, and stones to add texture and a fresh, organic feel. Press flowers and leaves to create beautiful, delicate designs for cards, bookmarks, or wall art. Stones can be painted and used as paperweights or garden markers, while twigs can be transformed into rustic frames or decorations.
Experiment with Color Palettes
Move beyond the typical pastel shades associated with spring. Try experimenting with bold, unexpected color combinations. Think of pairing vibrant hues like fuchsia and teal, or soft tones like lavender and mint green with metallic accents. Using a color wheel can help you discover harmonious and contrasting color schemes that make your crafts stand out.
Utilize Recyclable Materials
Give new life to old items by incorporating recyclable materials into your projects. Cardboard, glass jars, and plastic bottles can all be transformed into unique and beautiful crafts. This not only promotes sustainability but also adds a unique twist to your creations. For example, glass jars can become charming lanterns or vases, and cardboard can be cut and painted to create intricate designs.
Spring Crafts for Toddlers
#51 Pretty Paper Tulips

Materials Needed
- Tulip flower pattern
- Green paper straws
- Colored construction paper
- Hole punch
- Scissors
- Glue stick
Instructions
- Print and cut out the tulip flower pattern. Trace it onto colored construction paper and cut out the flower shape.
- Accordion fold the flower by folding it four times. Use a hole punch to punch a hole in the center of the folded flower.
- Unfold the tulip flower and weave a green paper straw through the holes.
- Cut out two thin leaves from green construction paper. Apply glue to the bottom of each leaf and attach them to the bottom of the paper straw.
Pretty Paper Tulips (with detailed steps and images)
#50 Handprint Lilies

Materials
- Pink or white printer paper, or construction paper
- Green pipe cleaners (6)
- Yellow pipe cleaners (6)
- Pencil
- Tape
- Scissors
Instructions
- Trace the outline of your hand onto a piece of paper.
- Cut out the handprint and erase any visible pencil marks.
- Curl the bottom of the handprint into a cone, leaving a small hole at the tip just large enough to fit a pipe cleaner snugly.
- Secure the cone shape with a small piece of tape.
- Use a round pencil, crayon, or marker to curl each “finger” of the handprint outward.
- Bend a yellow pipe cleaner in half.
- Create a small “J” hook at the end of a green pipe cleaner and loop it over the bend in the yellow pipe cleaner. Pinch the hook tightly to secure.
- Bend one side of the yellow pipe cleaner in half again, leaving the other side straight. Wrap the longer end tightly around the shorter bent sides until fully wrapped.
- Push the pipe cleaner stem through the hole in the handprint flower, pulling it through until the green stem is below the flower and the yellow part is centered in the middle.
- Repeat the steps to create multiple flowers and tie them together with a ribbon for a bouquet.
Handprint Lilies (with detailed steps and images)
#49 Paper Plate Spring Flowers

Materials:
- Small paper plates (dessert size)
- Paint (green and other desired colors for the flower)
- Craft stick
- Green paper (foam paper works well)
- Scissors
- Glue
Instructions:
- Prepare the flower petals:
- Cut small slits around the edge of the paper plate.
- Go back and cut another slit to connect the first one, removing a small piece to form the flower petals.
(Note: Young children may need help with the second slit.)
- Paint and dry:
- Paint the craft stick green and let it dry.
- Paint the paper plate in your desired flower color and let it dry.
- Assemble the flower:
- Glue the painted craft stick to the back of the paper plate as the flower stem.
- Cut two leaves from the green paper and glue them to either side of the craft stick.
Paper Plate Spring Flowers (with detailed steps and images)
#48 Simple Paper Flower

Materials Needed:
- Circle paper punch (extra-large recommended for younger kids)
- Yellow paper
- Colored paper (regular print paper works well)
- Paper cutter or scissors
- Stick glue
- Green paper drinking straws
- Clear tape (or patterned tape for fun)
Instructions:
- Prepare the Yellow Circles
- Punch yellow circles using the circle paper punch.
- Use a larger punch for easier handling by younger children.
- Cut Paper Strips
- Cut strips of colored paper.
- Adjust the length and width based on your circle size.
- Test by creating one paper loop to ensure it works with your circle size.
- Once satisfied, cut all strips to the same size.
- Make Paper Loops
- Glue the ends of the paper strips to form loops.
- Create enough loops depending on the size of your flower.
- Assemble the Flower
- Glue the loops onto one side of the yellow circle.
- Start by attaching 4 loops at a 90° angle.
- Add 4 more loops between those and continue until the flower looks full.
- Attach the Stem
- Apply glue to the top of the green paper straw.
- Press the straw onto the center of the flower.
- Secure it with clear tape.
- Finish the Craft
- Ensure everything is secure.
- Your paper flower craft is complete!
Simple Paper Flower (with detailed steps and images)
#47 Tissue Paper Cherry Blossoms

Materials Needed:
- Blue cardstock
- Brown paint
- Paintbrush
- Pink crepe paper
- Glue stick or school glue
- Scissors
- Stapler
Instructions:
- Paint tree branches on blue cardstock
- Pour brown paint onto a small plate.
- Use a paintbrush to paint cherry tree branches on the blue cardstock.
- Allow the paint to dry completely.
- Cut and glue pink crepe paper strips
- Cut six strips of pink crepe paper (18–24 inches long each).
- Turn the cardstock face down.
- Apply glue along the bottom edge of the back and attach the crepe paper strips.
- Add cherry blossoms to the tree branches
- Cut several dozen small squares from the pink crepe paper.
- Scrunch each square to form a cherry blossom.
- Apply glue to the branches and attach the blossoms until the branches are covered.
- Assemble the windsock
- Roll the decorated cardstock into a circle.
- Staple the ends together at the top and bottom.
- Create and attach the handle
- Cut a strip of pink cardstock (1 inch by 8 ½ inches).
- Apply glue to one end of the strip and attach it inside the top of the windsock.
- Glue the other end of the strip to the opposite side to form the handle.
Tissue Paper Cherry Blossoms (with detailed steps and images)
#46 Bottle Print Button Flowers

Materials Needed:
- Paint (two colors)
- Water bottle
- Yellow buttons
- Green marker or green paint
- Glue
- Plate
- Paper
Instructions:
- Pour two colors of paint onto a plate.
- Dip the bottom of the water bottle into the paint.
- Stamp the painted bottle bottom onto a piece of paper to create a flower shape.
- Glue a yellow button in the center of each flower.
- Use a green marker or green paint to draw stems and leaves for the flowers.
Bottle Print Button Flowers (with detailed steps and images)
#45 Cupcake Liner Flowers

Materials Needed:
- Regular cupcake liner
- Mini cupcake liner
- Green popsicle stick
- Large yellow sticker rhinestone
- Crafter’s tape
- Green construction paper
- Scissors
Instructions:
- Prepare the cupcake liners:
- Choose one large and one mini cupcake liner in the desired colors.
- Flatten them slightly to make folding easier.
- Create petal shapes:
- Fold each cupcake liner in half, then fold it in half again. Repeat until folded four times to create eight sections.
- Use scissors to cut a curved shape along the folded edge to form petals.
- Unfold both liners and ensure the petal shapes are distinct. If needed, refold and trim again.
- Assemble the flower:
- Position the cupcake liners with the bright side facing forward and white side at the back.
- Attach the mini cupcake liner on top of the large one using crafter’s tape.
- Stick a yellow rhinestone in the center of the flower.
- Make the leaves:
- Fold green construction paper by about 1.5 inches and cut out two leaf shapes along the fold.
- Attach the stem and leaves:
- Use crafter’s tape to attach the leaves to the back of the green popsicle stick.
- Attach the popsicle stick to the back of the assembled flower.
- Finish and display:
- Flip the flower over, and it’s complete!
- Repeat the process with different colors to create a vibrant bouquet.
Cupcake Liner Flowers (with detailed steps and images)
#44 Bubble Paint Hydrangeas

Materials:
- Non-toxic acrylic paint
- Non-toxic dish soap
- Water
- Straw
- Shallow dish (e.g., 6″x9″, 2″ deep)
- Cardstock or thick paper
- Paintbrush with a pointed tip (optional)
- Pen or marker for detailing
Instructions:
Step 1: Mix Bubble Paint
- Combine 1 part non-toxic acrylic paint, 1 part non-toxic dish soap, and 2-3 parts water in a shallow dish. Adjust water for desired thickness.
- Stir until well mixed.
Step 2: Create Bubble Patterns
- Use a straw to blow air into the mixture to create bubbles on the surface.
- When a cluster of bubbles forms, gently press a piece of cardstock onto the bubbles, ensuring it touches the bubbles but not the liquid paint below.
- Repeat this step to layer shapes and colors as desired.
Step 3: Add Color Variations
- Use multiple dishes for different paint colors.
- Choose shallow dishes to avoid smudging when pressing the paper.
Step 4: Make Bubble Painting Hydrangea Flowers
- Arrange bubble prints to resemble flower shapes.
- Add watercolor leaves around the prints by painting or cutting out paper leaves and gluing them.
- Enhance the leaves with simple pen or marker details (lines or dots).
Step 5: Add Stems and Final Details
- Use a paintbrush to draw stems and additional leaves.
- Add finer details to stems, flowers, and leaves using a pen or marker for a finished look.
Bubble Paint Hydrangeas (with detailed steps and images)
#43 Pipe Cleaner Flowers

Materials
- Multi-color pack of pipe cleaners
- Scissors
Instructions
- Prepare Pipe Cleaners: Take two pipe cleaners of the same color.
- Twist Ends Together: Twist the ends of the two pipe cleaners securely.
- Flatten Joint: Straighten the pipe cleaners into one line and flatten the twisted joint so it aligns smoothly.
- Create a Loop: Form a loop at one end of the joined pipe cleaners and twist it once to secure.
- Add Loops for Petals:
- Continue making loops next to each other, twisting to secure after each loop.
- Make 5 loops for a larger flower or 6 loops for a smaller flower.
- Secure Petal Ends: Wrap the remaining pipe cleaner end around the center of the flower to secure it.
- Add Center Color:
- Take a pipe cleaner of a different color and begin wrapping it around the center of the flower.
- Thread it through the center and between the flower petals.
- Secure Center: Twist the end of the second pipe cleaner around the wrapped center to finish.
Pipe Cleaner Flowers (with detailed steps and images)
#42 Lavender Cotton Swab Painting

Materials Needed:
- Card
- Paints (green, purple, white, black; acrylic recommended)
- Paintbrush
- Cotton swabs
Instructions:
- Step 1: Paint the Stalks
- Use a fine paintbrush to paint long green stalks onto the card.
- Step 2: Add Heart-Shaped Leaves
- Paint heart-shaped leaves in green and attach them to the stalks using fine brushstrokes.
- Step 3: Print the Lilacs
- Dip a cotton swab into purple paint and print dots around the stalks to create lilac flowers.
- Step 4: Add Shading
- Mix purple paint with white to create a lighter shade. Use a cotton swab to print lighter purple dots on one side of each flower for a 3D effect.
- Step 5: Detail the Leaves
- Mix a darker green shade and paint fine lines on the leaves to mimic veins.
Lavender Cotton Swab Painting (with detailed steps and images)
#41 Q-Tip Daisies

Materials:
- Cotton swabs (Q-tips)
- Yellow play dough
- Green pipe cleaners
- Blue paper (optional, for display)
- Glue (optional, for securing flowers to paper)
Instructions:
- Prepare the cotton swabs: Cut several cotton swabs in half.
- Shape the center of the flower:
- Roll a chunk of yellow play dough into a ball.
- Flatten the ball slightly between your palms.
- Add petals:
- Press the cut halves of cotton swabs into the flattened play dough around the edge to form petals.
- Create the stem:
- Insert a green pipe cleaner into the side of the play dough to form the flower stem.
- (Optional) Trim the pipe cleaner if needed and shape the remaining piece into a leaf. Glue the leaf to the stem or the paper.
- Display your flowers:
- Place the flowers in a vase for decoration or play.
- (Optional) Glue the flower to blue paper for a flat display.
- Optional extra flower: Add more daisies to create a complete picture or arrangement.
Q-Tip Daisies (with detailed steps and images)
#40 Paper Plate Flower Wreath
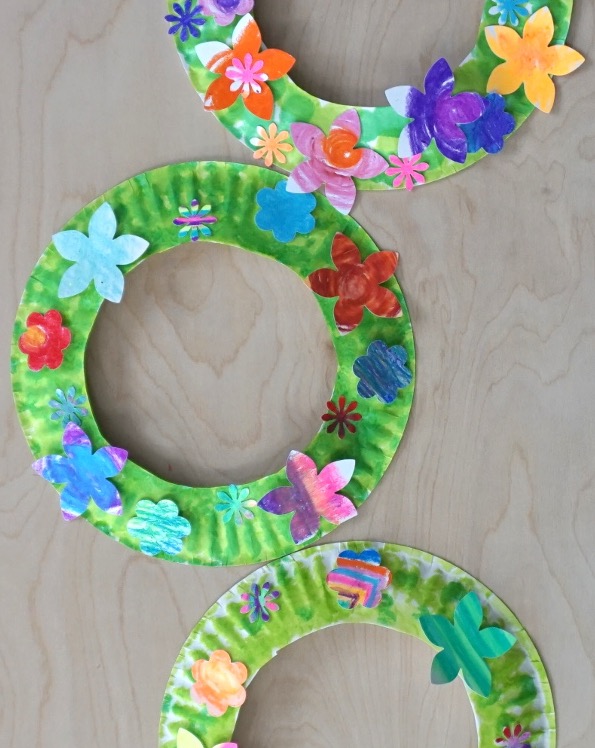
Materials
- Paper plate (center cut out)
- Dot marker (any colors)
- Oil pastels (regular and neon)
- White cardstock
- Glue
- Flower punches (e.g., 1 ½-inch flower punch or other flower shapes)
*Alternative: Flower cookie cutters and scissors if punches are unavailable
Instructions
- Prepare the Paper Plate:
Color the paper plate using dot markers. Alternatively, you can use crayons or markers. Let it dry. - Color the Cardstock:
Use oil pastels to color the white cardstock. Blend colors as desired to create vibrant or unique designs. - Punch Out Flower Shapes:
Use the flower punch to cut flower shapes from the colored cardstock. Ensure the paper is lined up correctly in the punch before pressing. - Create a Variety of Flowers:
Repeat the punching process to create flowers in various colors and sizes based on your preferences. - Assemble the Wreath:
Arrange the punched flowers on the paper plate wreath to your liking. Once satisfied with the arrangement, glue the flowers in place.
Paper Plate Flower Wreath (with detailed steps and images)
#39 Dot Flower Craft

Materials:
- Small dessert-sized paper plates
- Do-a-Dot markers (variety of colors)
Instructions:
- Start Stamping:
- Begin at the outer edge of the paper plate.
- Stamp around the circumference using one color of Do-a-Dot marker.
- Alternate Colors:
- Pick another color and stamp a circle just inside the first layer of dots.
- Continue alternating colors, creating additional circles within the previous layer.
- Fill the Center:
- Stamp the smallest area at the center of the plate with one final color.
- Creative Option:
- Allow kids to freely stamp dots across the plate for unique designs without following a structured pattern.
Dot Flower Craft (with detailed steps and images)
#38 Cherry Blossom Painting with Cotton Balls

Materials
- Canvas paper pad
- Acrylic paint (sky blue, black, light pink, dark pink, and white for mixing)
- Paintbrushes (include a larger flat brush for the sky)
- Paint palette and water container (recycled containers are fine)
- Cotton balls
- Clothespins (to hold cotton balls)
Instructions
- Prepare the Canvas
- Cut the canvas paper in half to create a horizontal painting surface.
- Mix Paint Colors
2. Mix sky blue and white for the background.
3. Mix pink and white to create two shades of pink (light and dark) for the cherry blossoms. - Paint the Sky
4. Use a flat brush to paint the entire canvas with the blue mix. Allow the sky to dry completely. Speed up drying with a hairdryer if needed. - Draw and Paint the Branch
5. Sketch a tree branch with a pencil.
6. Paint the branch black and let it dry. - Add Cherry Blossoms
7. Attach a cotton ball to a clothespin to use as a “brush.”
8. Paint cherry blossoms with the dark pink first.
9. Layer the lighter pink on top to add depth.
Cherry Blossom Painting with Cotton Balls (with detailed steps and images)
#37 Paper Plate Chick

Materials:
- Paper plates (2)
- Yellow paint
- Yellow card stock (optional)
- Orange card stock
- White card stock
- Paintbrush
- Scissors
- Glue stick
- Double-sided tape (optional)
- Paper plate chick template (download required)
Instructions:
- Prepare the Template
- Download and print the chick template.
- Cut out the template pieces.
- Paint the Plates
- Paint two paper plates with yellow paint.
- Allow the plates to dry completely.
- Assemble the Chick
- Eyes: Glue two eyes near the center of one plate.
- Beak: Attach the orange beak below the eyes.
- Add the Egg Pieces
- Attach the lower egg piece to the bottom of the chick’s body using double-sided tape.
- Tape the upper egg piece to the top of the chick’s head.
- Create the Wings
- Trace wing shapes onto the second plate and cut them out.
- Alternative: Use pre-cut yellow card stock pieces for the wings.
- Glue a wing on each side of the chick.
- Finalize
- Ensure all parts are securely glued or taped in place.
- Enjoy your adorable paper plate chick!
Paper Plate Chick (with detailed steps and images)
#36 Handprint Chicks

Materials:
- Yellow paint
- Orange paint
- White craft paper
- Yellow craft paper
- Orange craft paper
- Black pen
- Scissors
- Glue
- Huggies® Wipes (for mess control and cleanup)
Instructions:
- Handprints:
- Coat the child’s hands with yellow paint.
- Make a handprint of each hand on white paper, one at a time, holding their fingers still.
- Clean hands immediately using wipes to prevent messes.
- Footprints:
- Coat the child’s feet with orange paint.
- Make a footprint of each foot on white paper, one at a time.
- Clean feet promptly with wipes to avoid walking with paint-covered feet.
- Allow the handprints and footprints to dry.
- Chick Body:
- Cut a large oval out of yellow craft paper for the chick’s body.
- Cut two smaller ovals for the eyes and use the black pen to draw circles on them.
- Cut a triangle for the beak and a wavy shape for the top of the chick’s head.
- Glue the eyes, beak, and wavy top onto the chick’s body.
- Assembly:
- Cut around the dried handprints and footprints.
- (Optional) Trim the footprints for proportion if they are large.
- Glue the handprints to the sides of the chick for wings.
- Glue the footprints to the bottom of the chick for feet.
- Allow the glue to dry.
- Display:
- Hang the finished chick to enjoy your craft!
Handprint Chicks (with detailed steps and images)
#35 Wine Cork Chicks

Materials Needed
- Wine cork
- Yellow paint
- Orange construction paper
- White construction paper
- Scissors
- Black sharpie
Instructions
- Dip one end of the wine cork into yellow paint.
- Stamp the cork onto a white piece of paper to create chick bodies.
- Allow the yellow paint to dry completely.
- Use the black sharpie to draw legs and feet for the chicks.
- Fold the orange construction paper in half and cut out small triangles to create beaks.
- Attach the beaks to the chicks using glue or tape.
- Optionally, use the cork edges to add small wing shapes to the sides of the chick bodies with yellow paint.
Wine Cork Chicks (with detailed steps and images)
#34 Candy-Filled Egg Carton Chicks

Materials Needed:
- Empty egg carton
- Yellow non-toxic paint
- Construction paper (yellow and orange)
- Tape
- Glue (white glue works best)
- Black marker (e.g., Sharpie with a thin or brush tip)
- Scissors
Instructions:
- Prepare the Egg Carton:
- Cut out two sections of the egg carton.
- Trim the edges so they are even and the two pieces close together without gaps.
- Add a small piece of tape on both sides to allow easy opening and closing.
- Paint the Carton:
- Open the carton and paint the inside with yellow paint.
- Flip the carton and paint the outside as well.
- Apply at least two coats of paint for full coverage.
- Make the Beak and Wings:
- Cut two orange triangles for the beak.
- Cut two yellow triangles with an extended flap for the wings.
- Apply glue to the triangles and press the beak onto the inside of the egg carton.
- Attach the wings to the sides of the bottom egg carton piece.
- Add the Eyes:
- Use the black marker to draw two dots above the beak for the eyes.
- Create and Attach Feet:
- Cut out feet shapes from the orange paper.
- Glue the feet to the bottom of the egg carton.
- Fill with Candy:
- Add your favorite Easter candies inside the finished chick.
Candy-Filled Egg Carton Chicks (with detailed steps and images)
#33 Popsicle Stick Baby Chick

Materials:
- Jumbo Popsicle Sticks (3 per baby chick)
- White School Glue
- Yellow/Orange Cardstock
- Yellow Decorative Scrapbook Paper
- Yellow Paint
- Paint Brushes
- Paper Plate
- Scissors
- Black Marker
Instructions:
- Create the Triangle Frame
- Glue three popsicle sticks together to form a triangle.
- Let the glue dry completely. Repeat for each baby chick.
- Paint the Frame
- Pour yellow paint onto a paper plate.
- Paint the entire popsicle stick triangle frame yellow.
- Allow it to dry.
- Prepare Paper Cutouts
- Cut a triangular piece from yellow scrapbook paper to fit inside the popsicle stick frame (this will be the chick’s body).
- Trace your child’s hands on yellow cardstock and cut them out to create wings.
- From the remaining cardstock, cut:
- A small circle for the head
- Two long strips for legs
- A small triangle for the nose
- Assemble the Baby Chick
- Glue the triangular body piece onto the popsicle stick frame.
- Attach the wings, head, legs, and nose to complete the chick.
- Add Finishing Touches
- Use a black marker to draw eyes or other details.
- Add any additional embellishments if desired.
- Let everything dry completely before displaying.
Popsicle Stick Baby Chick (with detailed steps and images)
#32 Paper Plate Sheep Mask

Materials:
- 2 paper plates (dinner size for ewe mask, snack size for lamb mask)
- Cotton wool balls
- Paste or glue
- Scissors
- Hard cardboard (optional, for reinforcement)
Instructions:
- Prepare the Plates:
- Cut out the inner circle of each paper plate to create the base for the masks.
- Stick Cotton Wool:
- Provide cotton wool balls and paste to your toddler.
- Encourage them to dip the cotton wool in glue and stick it onto the paper plate until the plate is fully covered.
- Dry the Masks:
- Allow the masks to dry completely. If heavily glued, it may take a couple of days. Speed up drying by flipping the plates over to allow airflow underneath.
- Add Ears:
- Cut ear shapes from the middle sections of the paper plates.
- Glue the ears onto the back of the mask.
- Reinforce the Mask (Optional):
- If the mask becomes too heavy, glue a piece of hard cardboard to the back for extra support.
- Play:
- Let your toddler hold up the masks and enjoy pretending to be sheep by saying “Baaa!”
Paper Plate Sheep Mask (with detailed steps and images)
#31 Q-Tip Lamb

Materials:
- Q-tips
- White glue
- Fine-tip marker
- Pink pencil crayon
- Scissors
- White paper (preferably heavier card stock or the back of an old greeting card)
- 2 clothespins
- Red ribbon
Instructions:
- Prepare the Lamb Body and Head:
- Cut an extended oval for the body and an egg-shaped piece for the head from white paper.
- Keep the size manageable to avoid needing too many q-tips. About 3 inches for the body works well.
- Cut Q-tips:
- Cut off the tips of q-tips. Be cautious as they might fly around. Collect them as needed.
- Assemble the Body:
- Apply a small line of glue at one end of the body.
- Place q-tip ends neatly over the glue. Start at the edges and overlap subsequent layers.
- Continue adding glue and q-tips until the entire body is covered. Ensure the last row of q-tip ends is positioned to be covered by the head later.
- Let the body dry completely.
- Decorate the Head:
- Apply glue to the narrow part of the egg-shaped head piece and attach three q-tip ends.
- Add two sideways q-tips for ears, then cover them with more q-tip pieces.
- Draw closed eyes with eyelashes, a nose, and a mouth using the fine-tip marker. Practice on scrap paper first.
- Use a pink pencil crayon to add rosy cheeks.
- Add a Bow:
- Tie a small bow with red ribbon and glue it to the top of the lamb’s head. Repurpose ribbon from items like tags or accessories if possible.
- Attach the Head to the Body:
- Once both the body and head are completely dry, glue the head to the body. Wait overnight for better results, or use a glue gun for faster assembly.
- Add Clothespin Legs:
- Glue two clothespins to the back of the lamb to serve as legs. Allow to dry.
- Final Touches:
- Ensure everything is secure and dry.
- Display your cute q-tip lamb as a place card holder, part of a spring display, or a fun craft decoration.
Q-Tip Lamb (with detailed steps and images)
#30 Doily Sheep

Materials Needed
- Paper doilies
- Sheet of black paper
- Googly eyes (preferably oval ones)
- Glue
- Scissors
Instructions
- Prepare the doily for crafting.
- Cut a round or oval shape from the black paper for the sheep’s head and glue it onto the doily.
- Cut two oval shapes for the ears and attach them to the head.
- Add googly eyes to the head. Optionally, draw the mouth and nose with markers.
- Cut and glue legs to the back side of the doily.
Doily Sheep (with detailed steps and images)
#29 Paper Plate Easter Bunny Craft

Materials Needed
- Construction Paper (white and additional colors for ear details)
- Pom Poms
- Pipe Cleaners
- Googly Eyes
- Small Paper Plates
- Glue (tacky glue or hot glue with adult supervision)
- Tape (optional, for attaching ears)
- Black Marker
Instructions
- Make the Whiskers
- Twist 3 pipe cleaners together at the center.
- Glue the twisted center to the paper plate and allow to dry completely.
- Attach the Nose
- Glue a pom pom over the twisted center of the pipe cleaners (whiskers).
- Create the Ears
- Cut large ear shapes from white construction paper or cardstock.
- Cut smaller ear shapes from a different color (e.g., pink or yellow) and glue them inside the white ears.
- Attach the completed ears to the back of the paper plate using glue or tape.
- Add the Eyes and Mouth
- Glue on googly eyes or create eyes from construction paper.
- Draw the mouth using a black marker.
Paper Plate Easter Bunny Craft (with detailed steps and images)
#28 Pom Pom Bunnies

Materials
- Yarn (soft, thick yarn works best)
- Pony beads (black for eyes, pink for the nose)
- Felt (gray and pink)
- Clear thread
- Cotton balls
Equipment
- Glue gun
- Scissors
Instructions
Making the Pom Poms
- Small Pom Pom (head):
- Wrap yarn around two fingers at least 60 times.
- Carefully slide the looped yarn off your fingers, keeping the loops intact.
- Cut a 5-inch piece of yarn and slip it underneath the loops. Tie it tightly in the center.
- Use scissors to cut through all the loops.
- Trim and shape the pom pom until it looks even.
- Large Pom Pom (body):
- Wrap yarn around your whole hand multiple times (similar to the small pom pom).
- Follow the same steps as above to secure, cut, and trim.
- Use a glue gun to attach the small pom pom (head) to the large pom pom (body).
Assembling the Bunny
- Ears:
- Cut ear shapes out of gray felt and smaller inner ear shapes out of pink felt.
- Layer the pink felt on top of the gray felt. Pinch the bottom of the ears and glue them in place.
- Glue the ears onto the head.
- Eyes:
- Glue two black pony beads onto the smaller pom pom for the eyes.
- Whiskers and Nose:
- Loop clear thread together, tie it in the middle, and snip the loops to create whiskers.
- Glue the whiskers onto the bunny’s face.
- Glue a pink pony bead on top of the whiskers for the nose.
- Tail:
- Glue a cotton ball to the back of the large pom pom for the tail.
Pom Pom Bunnies (with detailed steps and images)
#27 Paper Plate Cotton Ball Bunny

Materials:
- Paper plate
- Cotton balls
- Googly eyes
- Brown pipe cleaners
- Pink pom poms
- White and pink construction paper
Tools:
- Craft glue
- Scissors
Instructions:
- Cover the paper plate with craft glue and have your child glue down cotton balls to create a fluffy bunny.
- Cut bunny ears from white and pink construction paper. Glue the smaller pink ears over the larger white ones.
- Attach the ears to the paper plate.
- Glue on googly eyes, whiskers, and nose.
- For whiskers, cut two brown pipe cleaners into four small pieces. Twist three pieces together to form the whiskers.
- Save the remaining two pipe cleaner pieces for another craft.
Paper Plate Cotton Ball Bunny (with detailed steps and images)
#26 Easy Paper Strips Bunny
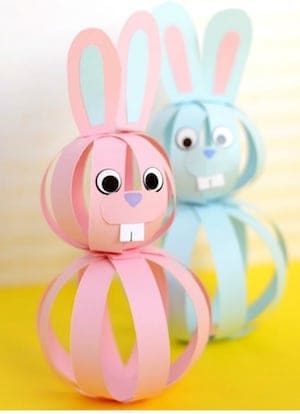
Materials:
- Pastel blue construction paper
- Pastel pink construction paper
- Scissors or paper trimmer
- Wiggle eye stickers
- Glue
- White paper
- Black marker
Instructions:
- Cut 4 long strips (length of A4 paper) and 4 shorter strips (width of A4 paper). The width should be about the size of a thumb.
- Take 2 long strips and glue them together to form a cross.
- Glue the other 2 long strips to form a snowflake shape.
- Repeat the process for the shorter strips.
- Glue the long strips in a loop to form a paper ball, repeating with the short strips for a smaller ball.
- Once both balls are made, glue them together and hold until dry.
- Cut ear shapes from pastel blue paper and smaller ear pieces from pastel pink paper. Glue the pink pieces inside the blue ears.
- Cut a snout from white paper, draw a nose, and cut small teeth. Draw a line in the middle of the teeth with a black marker and glue onto the snout.
- Glue the ears and snout onto the smaller ball (head of the bunny).
- Add wiggle eye stickers to complete the bunny.
- Let the glue dry completely before displaying your Easy Paper Bunny Craft.
Easy Paper Strips Bunny (with detailed steps and images)
#25 Cardboard Tube Butterflies

Materials:
- Toilet paper tubes
- Scrap paper
- Flower punches
- Circle punch
- Stapler
- Printer and paper (8×11.5, landscape orientation)
- Ribbon
- Wiggle eyes
Instructions:
- Cut a strip of paper to the length of the toilet paper tube, ensuring it wraps all the way around.
- Secure the strip of paper with a staple at the top and bottom.
- If the middle is loose, add another staple for extra hold.
- Cover the entire tube with colored paper, using different colors for a vibrant look.
- Print and cut out the wing pattern sized for 8×11.5 paper.
- Trace the wing shape onto colored paper and cut it out.
- For each wing, punch out multiple flowers and flower centers to decorate.
- To save paper, allow flowers to overhang the edges, then trim the excess.
- Staple the wings to the back of the tube, mixing and matching colors if desired.
- Cut strips of ribbon, tie a knot at one end, then add a knot to each ribbon.
- Attach the ribbon high on the tube so they stick up well.
- Stick wiggle eyes on the front of the tube, below the ribbons, using different sizes for a fun, cutesy look.
- Your butterflies are ready to play with and enjoy!
Cardboard Tube Butterflies (with detailed steps and images)
#24 Butterfly Thumbprint Flower Pots

Materials:
- Terracotta flower pot
- Acrylic paint in multiple colors
- Paint brush
- Paper plate
- Permanent marker
- Plants (e.g., daffodils, herbs)
Instructions:
- Paint a colored stripe around the top edge of the flower pot using bright colors like blue and yellow.
- Put some paint on a paper plate, and use your thumb to create a butterfly shape on the flower pot.
- Once the paint is dry, use a permanent marker to draw the butterfly’s body and antennae.
- Remove plants from their original pots and transplant them into the painted flower pots.
- Place the finished flower pots in a bright spot, such as a kitchen windowsill, to add a cheerful touch to your room.
Butterfly Thumbprint Flower Pots (with detailed steps and images)
#23 Bow-Tie Noodle Butterflies

Materials Needed:
- Fun chalk markers or paint
- Black sharpie
- White paper
- Small bow-tie noodles
- Glue
Instructions:
- Paint the bow-tie noodles with bright colors and allow them to dry.
- Cut the noodles in half and paint them green for the grass.
- Glue the green noodles to a piece of white cardstock paper.
- Use the sharpie to add antennas and dots behind the noodles to create the appearance of flying butterflies.
Bow-Tie Noodle Butterflies (with detailed steps and images)
#22 Beaded Pipe Cleaner Butterflies

Materials:
- 2 x 12-inch pipe cleaners
- 1 x 6-inch pipe cleaner
- Plastic pony beads (approx. 40 beads per 12-inch pipe cleaner)
- Clothespin
- White glue
- Glitter
Instructions:
- Add about 40 pony beads to each 12-inch pipe cleaner, leaving about 1 inch of space at both ends.
- Take both ends of each beaded pipe cleaner and cross them slightly to form a circle. Twist the ends to complete the circle.
- Spread the beads apart at the top and bottom of the circle, leaving about 1/2 inch of pipe cleaner exposed.
- Pinch the top and bottom of the circle and twist 2–3 times to form an “8” shape.
- Repeat these steps for the second beaded pipe cleaner to create two butterfly wings.
- (Optional) For glittered effect: Apply white glue generously to the top of the clothespin and sprinkle glitter on top. Allow to dry for a couple of hours.
- After the glitter has dried, open the clothespin and insert the butterfly wings without gluing them in place. Adjust the wings into even shapes.
- Take the 6-inch pipe cleaner, fold in half, and add a pony bead to one end. Curl it around to make a spiral for the antenna. Repeat on the other end for the second antenna.
Beaded Pipe Cleaner Butterflies (with detailed steps and images)
#21 Coffee Filter Butterflies
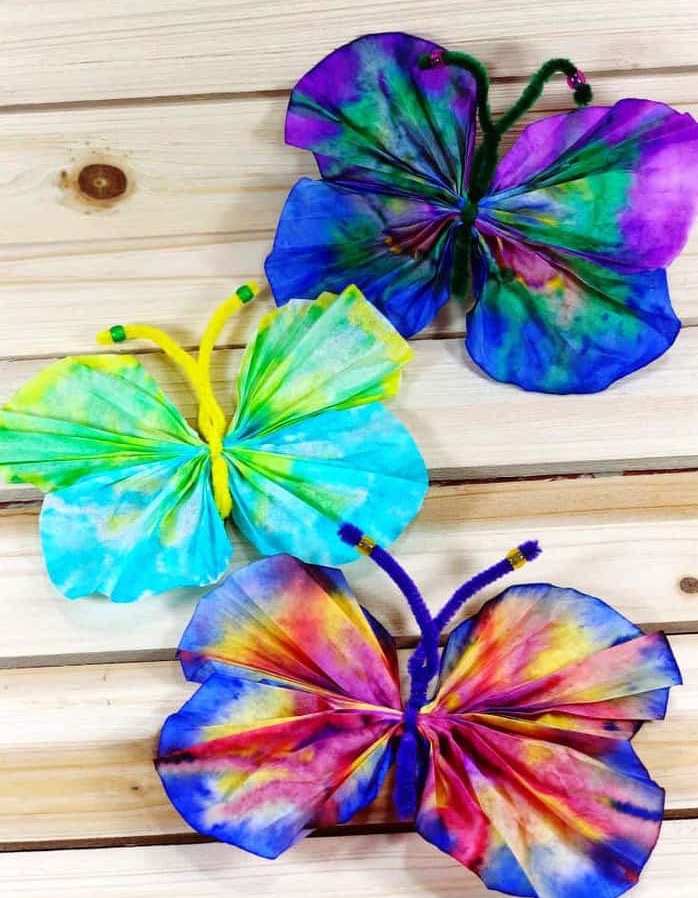
Materials:
- Dollar Store Coffee Filters
- Dollar Store Washable Markers
- Dollar Store Chenille Stems
- Dollar Store Pony Beads
- Dollar Store Zippered Bags (Gallon Size)
- Spray Bottle filled with water
Instructions:
- Flatten a coffee filter on top of a gallon size zippered bag. Use washable markers to draw random designs on the filter. Avoid color combinations next to each other on the color wheel to prevent muddy blends (e.g., red and green).
- Mist the coffee filter with water using a spray bottle and let it dry completely. Watch the colors blend and mix.
- Create two tie-dyed coffee filters for each butterfly.
- Fan fold both coffee filters to form the butterfly’s wings.
- Stack the fan-folded filters on top of each other.
- Fold a chenille stem in half. Position the coffee filters one-third from the base, twist the stem tightly around the filters.
- Leave a ½” loop at the top of the stem and twist again to form the butterfly’s head and antennae.
- Open the wings of the butterfly and pinch at the ends to maintain the folds.
- Thread a pony bead onto the end of each antenna and curl them into a swirl.
Coffee Filter Butterflies (with detailed steps and images)
#20 Paper Plate Butterfly
Materials:
- Regular size paper plate
- Small size paper plate
- Two 10-inch white heart paper doilies
- Paint (color of your choice)
- Paintbrush
- Washi tape
- Pipe cleaner (cut in half)
- Googly eyes
- Pink marker
- Scissors
- Stapler (optional)
- Glue
Instructions:
- Trim the sides of the regular paper plate to form a butterfly body. Paint both the regular and small paper plates. Allow the paint to dry completely.
- Staple or glue the small paper plate onto the top of the regular paper plate. Add washi tape along the butterfly’s body.
- Attach the heart doilies to the back of the plates for wings. Tape the pipe cleaner antennae onto the back using washi tape.
- Glue the googly eyes onto the butterfly, and draw a mouth with the pink marker to complete the craft.
Paper Plate Butterfly (with detailed steps and images)
#19 Chunky Rainbow Butterflies

Chunky Rainbow Butterflies (with detailed steps and images)
#18 Paper Rainbow

Materials:
- Construction or regular paper in rainbow colors
- White construction paper
- Wiggle eyes stickers
- Scissors
- Glue
- Black marker
Instructions:
- Cut one long strip of paper in each color of the rainbow (or pre-cut the strips if needed).
- Cut a cloud shape from white construction paper.
- Glue the colorful strips of paper on one side of the cloud.
- Let the glue dry (use a glue stick for faster setting).
- Flip the cloud over and stick on two wiggle eye stickers (or draw eyes).
- Draw a mouth to complete the face.
- Your cute paper rainbow is now ready to be displayed as a decoration!
Paper Rainbow (with detailed steps and images)
#17 Coffee Filter Rainbow with Smiling Cloud

Materials
- Rainbow Cloud Pattern (available by filling out the form at the bottom of the post)
- Round White Coffee Filters
- Assorted Googly Eyes
- Washable Markers
- White and Pink Craft Paper
Tools
- Glue gun and glue sticks or liquid glue with fine tip applicator
- Water spray bottle
- Scissors
Instructions
- Flatten round coffee filters and color them in rainbow order using washable markers.
- Place the colored coffee filters on a cookie sheet and mist with water to allow colors to spread and blend.
- Let filters dry for 1-2 hours (use a hair dryer to speed up the drying process if needed).
- Once dry, fold the filters in half and cut along the fold to create two rainbow shapes from each filter.
- Cut a cloud shape from white craft paper using the free printable pattern or freehand.
- Glue the cloud shape to the rainbow using glue.
- Cut two circles from pink craft paper for cheeks and glue them onto the cloud.
- Glue on googly eyes, then draw a smile on the cloud with a marker to complete the face.
- Display your colorful rainbow cloud craft as a spring decoration!
Coffee Filter Rainbow with Smiling Cloud (with detailed steps and images)
#16 Paper Plate Rainbow

Materials:
- Paper Plate
- Paint (Red, Yellow, Blue at a minimum)
- Cotton Wool
- PVA Glue
- Scissors
Instructions:
- Cut the paper plate in half.
- Cut a small semi-circle from the center of the plate.
- Paint the outer edges of the paper plate to create a rainbow using red, orange, yellow, green, blue, and purple (you can mix the colors or use them individually).
- Let the paint dry completely.
- Separate the cotton wool into small balls.
- Glue the cotton wool balls along the bottom of each rainbow arch to form clouds.
- Your paper plate rainbow craft is now complete!
Paper Plate Rainbow (with detailed steps and images)
#15 Stained Glass Rainbow

Materials:
- Construction paper (any color, black recommended)
- Contact paper
- Scissors
- Tissue paper in rainbow colors
Instructions:
- Fold construction paper in half and cut a half rainbow shape.
- Unfold to reveal a full rainbow shape.
- Leave the paper folded and cut stripes from the top of the rainbow to the bottom, leaving the bottom edge uncut.
- Repeat the process six times, leaving space between each stripe, until the rainbow shape is complete.
- Open the rainbow shape and place it sticky side down on a sheet of contact paper.
- Cut or rip tissue paper into squares or pieces.
- Stick the tissue paper pieces onto the rainbow shape; the contact paper will hold them in place.
- Optionally, add another sheet of contact paper on top for extra durability.
Stained Glass Rainbow (with detailed steps and images)
#14 Fruit Loop Rainbow

Materials Needed:
- Fruit Loop Cereal
- Printable Rainbow Template
- Glue
Instructions:
- Print the rainbow template.
- Sort the Fruit Loops by color: red, orange, yellow, green, blue, and violet.
- Apply glue to each section of the rainbow template.
- Place the Fruit Loops on the glue, one at a time, matching the colors of the rainbow.
- Optionally, use a line of glue for a quicker approach.
Fruit Loop Rainbow (with detailed steps and images)
#13 Craft Stick Flower Pots

Materials:
- Colored craft sticks
- Rubber bands
- Clean tin cans
- Ribbon
- Soil
- Flowers
Instructions:
- Place a rubber band around the tin can, ensuring it fits snugly.
- Insert a craft stick under the rubber band and continue placing them around the can until fully covered.
- To hide the rubber band, wrap ribbon around the can, tie it in a bow or knot, and trim any excess.
- Fill the can with soil and plant a flower.
- Optional: Poke holes at the bottom of the can for drainage before starting, if desired.
Craft Stick Flower Pots (with detailed steps and images)
#12 Popsicle Stick Bird Feeder

Materials:
- Jumbo Colored Craft Sticks
- Twine
- Bird Seed
- Hot Glue Gun
- Wood Glue
Instructions:
- Lay out six jumbo craft sticks next to each other to form the base of the bird feeder.
- Glue two sticks across the six base sticks at each end to hold the base together.
- Add hot glue dots to the four corners of the base sticks and place additional sticks on top, running in the opposite direction.
- For the perch, glue a craft stick in the center of the base, perpendicular to the other sticks.
- Continue gluing sticks around the outside of the base.
- For added support, glue blue sticks over the perch and secure the corners.
- Cut four pieces of twine, each about 2 feet long.
- Tie each piece of twine to the corners of the feeder to help distribute its weight.
- Tie the twine ends in loops to hang the feeder securely.
- Fill the bird feeder with bird seed and hang it up for the birds to enjoy!
Popsicle Stick Bird Feeder (with detailed steps and images)
#11 Handprint Carrot Card for Kids

Materials:
- Colored card stock (orange, green, pink)
- White card stock
- Scissors
- Pencil
- Glue stick
- Stapler
- Black and orange markers
- Carrot template (optional)
Instructions:
- Download and print the carrot template: orange card stock for the body, white card stock for the eyes.
- Cut out the carrot pieces and eyes.
- Trace your child’s handprint twice on green card stock and cut out the shapes.
- Staple the carrot pieces together at the top.
- Glue the handprints on top of the carrot.
- Glue the eyes below the handprints.
- Cut two small ovals from pink card stock for cheeks and glue them below the eyes.
- Use the black marker to draw a smile and the orange marker to add marks on the carrot.
- Flip open the card and write your message inside.
Handprint Carrot Card for Kids (with detailed steps and images)
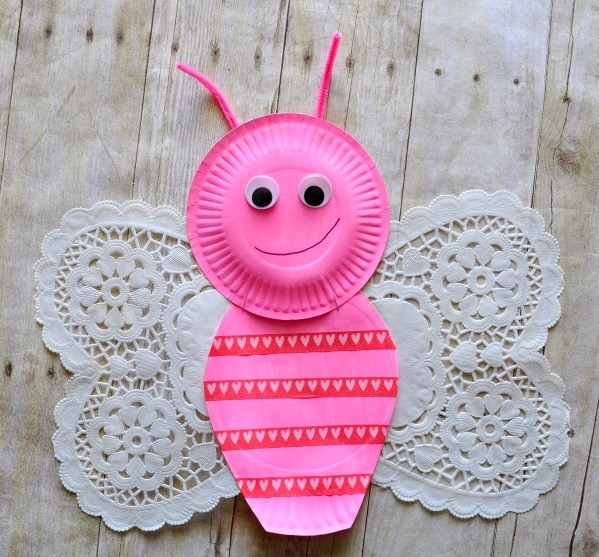
#10 Paper Plate Bee

Supplies:
- White or yellow paper plate
- Yellow and black paint
- Pom poms
- Wooden clothespins
- Googly eyes
- Glue
Instructions:
- Paint the paper plate yellow and let it dry.
- Use a pom pom with a clothespin as a handle to paint black stripes halfway up the plate, leaving the top yellow for the eyes.
- Paint two wooden clothespins black, and once dry, glue a black pom pom to the top of each.
- Glue googly eyes at the top of the paper plate to complete the bee.
Paper Plate Bee (with detailed steps and images)
#9 Pom Pom Caterpillars

Materials:
- Pom poms
- Googly eyes
- Green construction paper
- White school glue
- Dark green marker
- Scissors
Instructions:
- Draw a leaf shape on the green construction paper.
- Cut out the leaf.
- Apply white school glue in an S shape on the leaf.
- Place small pom poms along the glue line.
- Glue two googly eyes on a larger pom pom.
- Attach the large pom pom (with eyes) onto the leaf.
Pom Pom Caterpillars (with detailed steps and images)
#8 Egg Carton Bee

Materials for Egg Carton Bee Craft:
- Egg carton
- Scissors
- Yellow paint and paintbrush
- Googly eyes
- Glue
- Black yarn
- White construction paper
- Black Sharpie
Instructions for Egg Carton Bee Craft:
- Cut the egg carton into individual sections, one for each bee.
- Paint the section yellow and allow it to dry. (If the carton is dark, first paint white, then yellow.)
- Make a small slit at the front bottom of the carton. Insert one end of black yarn into the slit.
- Wrap the yarn around the body. Make another slit at the back to secure the yarn and trim off any extra.
- Glue googly eyes to the front and draw a mouth with the black Sharpie.
- Cut out small wings from the white construction paper and glue them on top of the bee.
Egg Carton Bee (with detailed steps and images)
#7 Raindrop Sun Catchers

Materials:
- Blue crayons
- Pencil or crayon sharpener
- Waxed paper
- Iron (for adult use only)
- Scissors
- Hole puncher
- Embroidery floss
Instructions:
- Peel the blue crayons (or allow students to choose their favorite shades).
- Sharpen the crayons and collect the shavings on a large sheet of waxed paper.
- Spread the shavings evenly across the waxed paper.
- Lay another sheet of waxed paper on top.
- Use an iron on the lowest setting to melt the crayon shavings, with a quick swipe over the waxed paper.
- Let the melted wax cool.
- Draw and cut out raindrop shapes from the waxed paper.
- Use a hole puncher and embroidery floss to create a string for hanging.
- Display the raindrop suncatchers in windows for a colorful effect.
Raindrop Sun Catchers (with detailed steps and images)
#6 April Showers Rain Cloud Windsock

Materials Needed:
- Blue construction paper
- Cotton balls
- Blue or white yarn
- Pipe cleaner
- Scissors
- Hole punch
- Glue
- Tape
Instructions:
- Cut the yarn into 1-2 foot sections (pre-cut to save time).
- Cut out raindrops using a template from light blue construction paper (fold paper to cut multiple at once).
- Punch 6 holes along the bottom edge of the blue construction paper and 2 holes on the top.
- Glue cotton balls onto the blue construction paper to make clouds.
- Roll the paper into a tube and secure with tape (you may need help for younger children).
- Punch holes along the bottom of the windsock if not pre-done.
- Thread the yarn through the holes (no need to tie, as raindrops will be attached to each yarn end).
- Glue a raindrop to each end of the yarn.
- Insert a pipe cleaner through the top holes of the windsock and bend the ends to secure.
April Showers Rain Cloud Windsock (with detailed steps and images)
#5 Pom-Pom Caterpillars

Materials:
- Colored craft paper (e.g., green for leaves)
- Large pom poms
- Small googly eyes
- Scissors
- Glue
- Hole punch
- Free pom pom caterpillar craft leaf template (available for download)
Instructions:
- Cut Out the Leaves:
- Print out the leaf template or freehand a design slightly larger than your caterpillar.
- Cut out the leaves.
- Punch Holes in the Leaves:
- Use the hole punch to create 3-6 holes around the leaf edges for a “munching” effect.
- Add Leaf Details:
- Use a green marker to draw vein patterns on your leaf.
- Create the Caterpillar:
- Arrange pom poms side by side to form the body of your caterpillar.
- Glue them together. The caterpillar can be as long or short as you like.
- Add Eyes to Your Caterpillar:
- Once the caterpillar has dried, glue two googly eyes on the front pom pom, preferably on the top.
- Place the Caterpillar on the Leaf:
- After the caterpillar has dried completely, glue it onto the leaf.
Pom-Pom Caterpillars (with detailed steps and images)
#4 Umbrella Craft

Materials Needed:
- Color papers
- 1 light blue cardstock
- Scissors
- Glue
- Yarn (cut into 5 cm pieces)
- 1 pipe cleaner
- 1 toothpick (for applying glue)
Instructions:
- Prepare the Circles:
- Print out and cut out 9-10 circles from different colored papers using the template.
- Make the Canopy:
- Fold each circle in half, then fold it again to create a “pizza slice.”
- Apply glue between the corners using a toothpick, then fold and press until the glue dries (use clothespins if needed).
- Assemble the Umbrella Canopy:
- Apply glue on one end of a pizza slice and attach it to another, ensuring the glued side is on the inside.
- Repeat for all slices, then press to set the glue.
- Once the last slice is added, glue the edges together and hold until dry.
- Adjust the folds evenly to form the umbrella shape.
- Make the Handle:
- Thread the pipe cleaner through the center hole, form a hook, and trim any excess.
- Add the Raindrops:
- Print and cut out raindrop shapes from the light blue cardstock.
- Apply glue to the tips of 9-10 raindrops and attach the yarn pieces to each.
- Glue each raindrop to the umbrella by attaching the yarn to each pizza slice.
Umbrella Craft (with detailed steps and images)
#3 Paper Plate Frogs

Materials Needed:
- Paper plate
- Green paint
- Cardstock (black, white, red)
- 1” circle paper punch
- Brown sharpie
- Black sharpie (thick)
- X-acto knife
- Scissors
- Glue stick and/or school glue
- Clear tape
Instructions:
- Paint the paper plate green and let it dry.
- Cut the paper plate in half.
- Use a mason jar rim to trace and cut out 2 circles from one half of the plate.
- Trace the circles on white cardstock, cut inside the lines to make them smaller than the green circles.
- Use the 1” paper punch to cut 2 black circles from cardstock.
- Glue the black circles onto the white circles, then glue the eyes to the top of the other half of the paper plate.
- Draw 2 small circles beneath the eyes for the nostrils with the brown sharpie.
- Draw a large mouth with the black sharpie across the bottom of the plate.
- Have an adult use an X-acto knife to create a 2” slit along the mouth.
- Cut a strip of red cardstock and roll it around a pencil, curling it from one end to the other.
- Slide the curled red paper into the mouth slit and secure the end with clear tape at the back of the plate.
Paper Plate Frogs (with detailed steps and images)
#2 Recycled CD Ladybug

Recycled CD Ladybug Supplies:
- CD
- Construction Paper
- Black Acrylic Paint
- Glue
- Scissors
- Black Marker
Directions:
- Paint the CD black or cut out a black circle to glue onto the CD.
- Trace and cut out handprints from red construction paper for the ladybug’s wings.
- Use a black marker to draw black circles on the handprint wings.
- Cut out black antennas and glue them along with the handprints onto the painted CD.
Recycled CD Ladybug (with detailed steps and images)
#1 Frog on Lily Pad

Materials:
- Printable template (available in the TPT store)
- Card stock in assorted bright colors or white
- Markers, pencils, or crayons (for coloring)
- Scissors
- Glue stick
- Ruler
- Optional: Dot stickers
Instructions:
- Print the template according to the selected version.
For the Colour-in Version:
- Color the frog, lily pad, and tongue.
For the Coloured Paper Version:
- Color the tongue and lily pad lines.
- Cut out all shapes.
For Both Versions:
- Glue on the eyes.
- Decorate the frog with dot stickers or markers.
- Glue lily pad lines onto the lily pad and trim.
Making the Tongue:
- Curl the tongue around a pencil and glue it on.
- For a red double-sided tongue, cut a thin strip from red construction paper.
Making the Paper Spring:
- Fold paper strips at right angles to form a spring.
- Glue the spring to the lily pad.
- Attach the frog to the spring.
Frog on Lily Pad (with detailed steps and images)
What are some simple spring crafts for beginners?
For those new to crafting, here are some easy and enjoyable projects:
Paper Flowers: Use tissue paper or colored paper to create simple, beautiful flowers.
Butterfly Magnets: Decorate paper butterflies and attach them to magnets for a cheerful fridge decoration.
Decorated Flower Pots: Paint or decorate small terracotta pots to plant spring flowers or herbs.
Egg Carton Caterpillars: Use egg cartons, paint, and googly eyes to create cute caterpillars.
What are some eco-friendly spring craft ideas?
Eco-friendly crafts utilize recycled or natural materials, promoting sustainability:
Seed Bombs: Combine clay, compost, and wildflower seeds to make seed bombs that can be planted to grow flowers.
Bird Feeders: Create bird feeders using pinecones, peanut butter, and birdseed.
Recycled Paper Beads: Roll strips of old magazines or newspapers into beads to make jewelry.
Bottle Cap Magnets: Decorate old bottle caps with paint or small photos, then attach magnets to the back.
How can I decorate my home with spring crafts?
Spring crafts can bring a touch of the season into your home decor:
Spring Wreaths: Use a base of twigs or a foam ring and decorate with artificial flowers, ribbons, and other spring-themed items.
Flower Garlands: String together paper or fabric flowers to create a garland for mantels, doorways, or windows.
Table Centerpieces: Arrange a combination of fresh flowers, candles, and decorated eggs in a bowl or tray.
Decorative Lanterns: Decorate mason jars with tissue paper and mod podge, then place a candle inside for a warm, colorful glow.
What are some advanced spring craft projects?
For experienced crafters looking for a challenge, try these projects:
Embroidery Hoop Art: Use an embroidery hoop and fabric to create a spring-themed design with embroidery floss.
Macramé Plant Hangers: Create intricate macramé plant hangers to display your spring flowers or indoor plants.
Paper Quilling: Make detailed spring scenes or flower designs using the technique of paper quilling.
Shadow Boxes: Create a 3D spring scene inside a shadow box using various craft materials and natural elements.


