Autumn Fall Acrylic Nails are the perfect way to embrace the season’s rich hues and cozy vibes. From deep burgundy to burnt orange, these nail designs capture the essence of fall. As the leaves start to change and the air gets crisper, there’s no better time to refresh your look with a stunning set of acrylic nails that reflect the beauty of autumn.


The possibilities for autumn-inspired acrylic nails are endless, whether you prefer subtle elegance or bold statement designs. Think about incorporating shades of mustard yellow, forest green, and chocolate brown, or adding intricate leaf patterns and gold accents for a touch of glamour. These nails are more than just a fashion statement; they’re a celebration of the season.
Choosing the right fall acrylic nails can elevate your entire look, making your hands a centerpiece of your autumn wardrobe. Whether you’re attending a pumpkin patch outing, a cozy coffee date, or a festive fall event, these nails will make sure you stand out. Embrace the season’s trends and let your nails reflect the warm, inviting spirit of autumn.
1. Balance Warm and Cool Tones
When designing autumn acrylic nails, consider the balance between warm and cool tones. Warm hues like deep oranges and browns can be enhanced by introducing cooler shades like slate grey or muted blue to create depth and contrast. This approach not only keeps the design visually interesting but also ensures that the nails complement a variety of skin tones and seasonal outfits.
2. Incorporate Texture for Added Dimension
Texture is a game-changer in nail design, especially in the fall. Experiment with matte finishes, subtle glitter, or velvet-like surfaces to add dimension to your acrylic nails. Textured elements catch the light differently, making the design stand out without being overly flashy, and give a more sophisticated, professional finish.
3. Use Negative Space Strategically
Negative space is an elegant way to make a statement with fall nails. By leaving certain areas of the nail bare or lightly tinted, you can draw attention to specific design elements. This technique adds a modern twist to traditional autumn colors and patterns, keeping the look fresh and on-trend without overwhelming the eye.
Autumn Fall Acrylic Nails
17. Warm Orange Hues with Autumn Leaf Accent

Supplies Needed
- Base Coat: OPI Natural Nail Base Coat
- Orange Polish: Essie “Playing Koi”
- Leaf Sticker: Clear Autumn Leaf Decal
- Top Coat: Seche Vite Dry Fast Top Coat
How to Achieve the Look
- Prep Your Nails: Start by applying a base coat to protect them.
- Add Color: Apply two layers of the orange polish to achieve a rich, bold shade.
- Accent Nail: On one nail, carefully place the leaf sticker on a clear or nude base.
- Seal the Design: Finish with a top coat for a shiny, lasting finish.
16. Minimalist Leopard Print on Soft White

Materials Needed
- Base coat: Sally Hansen “Hard as Nails”
- White nail polish: OPI “Alpine Snow”
- Leopard print striping tape or nail art pen: Glamstripes Leopard Print Tape
- Top coat: Essie “Good to Go” Top Coat
How to Achieve the Look
- Start with a base coat to keep your nails protected.
- Apply two layers of white nail polish on all your nails to ensure complete coverage.
- Use the leopard print striping tape or a nail art pen to add a stripe down the center of one nail.
- Finish with a top coat to lock in the design and add a glossy finish.
15. Modern Abstract in Autumn Tones

Materials Needed
- Base coat: Zoya Anchor Basecoat
- Matte orange nail polish: Zoya “Sawyer”
- Deep green nail polish: Essie “Off Tropic”
- Taupe nail polish: OPI “Taupe-less Beach”
- Gold leaf flakes: Gold Leaf Nail Art
- Matte top coat: OPI Matte Top Coat
How to Achieve This Look
- Start by applying a base coat to protect your nails.
- Paint each nail with a different color: orange, green, and taupe. Make sure to apply two coats for complete coverage.
- Use a thin nail art brush to create geometric patterns with the contrasting colors.
- Add small gold leaf flakes for a touch of elegance.
- Finish with a matte top coat for a chic, sophisticated look.
14. Rich Chocolate Brown

Supplies You’ll Need
- Base coat: Orly Bonder Basecoat
- Dark brown polish: Essie “Wicked”
- Top coat: Sally Hansen Miracle Gel Top Coat
How to Get the Look
- Start by applying a base coat to your nails for a smooth, even surface and longer-lasting wear.
- Next, paint your nails with the dark brown polish. Apply two coats to achieve a deep, rich color.
- Finish with a high-shine top coat to enhance the color and protect your manicure.
13. Mustard Yellow with a Hint of Sparkle

Essentials
- Base coat: Deborah Lippmann Gel Lab Pro Base Coat
- Mustard yellow polish with glitter: ILNP “Butternut”
- Top coat: Butter London Hardwear Shine UV Topcoat
How to Get the Look
- Start by applying a base coat to protect and strengthen your nails.
- Next, apply two coats of the mustard yellow polish, allowing each layer to fully dry.
- Finish with a top coat to add shine and lock in the glitter, ensuring your manicure stays vibrant.
12. Gold Foil Leopard Print

Supplies Needed
- Base coat: Essie “All in One”
- Neutral polish: OPI “Dulce de Leche”
- Gold foil: Gold Foil Nail Art
- Leopard print stamping plate: MoYou London “Animalistic Collection”
- Top coat: Seche Vite Dry Fast Top Coat
How to Achieve the Look
- Start by applying a base coat to protect your nails and create a smooth surface.
- Next, paint your nails with the neutral polish. Apply two layers for a consistent, opaque finish.
- Use the leopard print stamping plate to create the leopard pattern, then carefully add the gold foil to highlight the spots.
- Finish off by applying a top coat to secure the design and give your nails a shiny, polished look.
11. Mint Green and White Abstract Swirls

Supplies Needed
- Base Coat: OPI Infinite Shine ProStay Primer
- Mint Green Polish: Essie “Mint Candy Apple”
- White Polish: Essie “Blanc”
- Glitter Tape: Nail Art Striping Tape in Silver Glitter
- Top Coat: Sally Hansen Miracle Gel Top Coat
How to Create the Design
- Start by applying a base coat to protect your nails and ensure the polish lasts longer.
- Apply two coats of white polish to create a solid base.
- Using a fine nail art brush, carefully paint mint green swirls that follow the natural shape of your nails.
- Apply glitter striping tape to highlight the design.
- Finish with a top coat for extra shine and long-lasting wear.
10. Black and White French Tips

Supplies You’ll Need
- Base coat: Zoya Anchor Basecoat
- Black nail polish: OPI “Black Onyx”
- White nail polish: Essie “Blanc”
- Top coat: CND Super Shiney Top Coat
How to Create the Style
- Start by applying a base coat to your nails to ensure a smooth finish and longer-lasting wear.
- Next, paint your nails with the black polish, using two coats for a solid color.
- Carefully use a striping brush to add the white tips, making sure they are even and precise.
- Finish off with a top coat to protect your design and give it a glossy shine.
9. Deep Mauve Gloss

Essentials
- Base layer: Butter London Nail Foundation
- Mauve color: Essie “Mauve-tivation”
- Top layer: Deborah Lippmann Addicted to Speed Top Coat
How to Get the Look
- Begin with a base layer to keep your nails safe and help the polish stick better.
- Next, apply two layers of the mauve color, letting each one dry fully in between.
- Finish off with a top layer to give your manicure a glossy finish and make it last longer.
8. Cobalt Blue with Metallic Accents

Materials Needed
- Base Coat: Orly Bonder Basecoat
- Cobalt Blue Polish: Essie “Butler Please”
- Metallic Silver Foil: Silver Foil Nail Art
- Top Coat: Essie “Gel Setter” Top Coat
Steps to Achieve the Look
- Start by applying the base coat to your nails to ensure a smooth application and protect against chipping.
- Paint your nails with the cobalt blue polish, using two coats to achieve a bold and even color.
- Add the metallic silver foil to one or two accent nails, gently pressing it onto the tacky polish for a stylish touch.
- Finish with a top coat to secure the foil and give your nails a glossy, salon-quality finish.
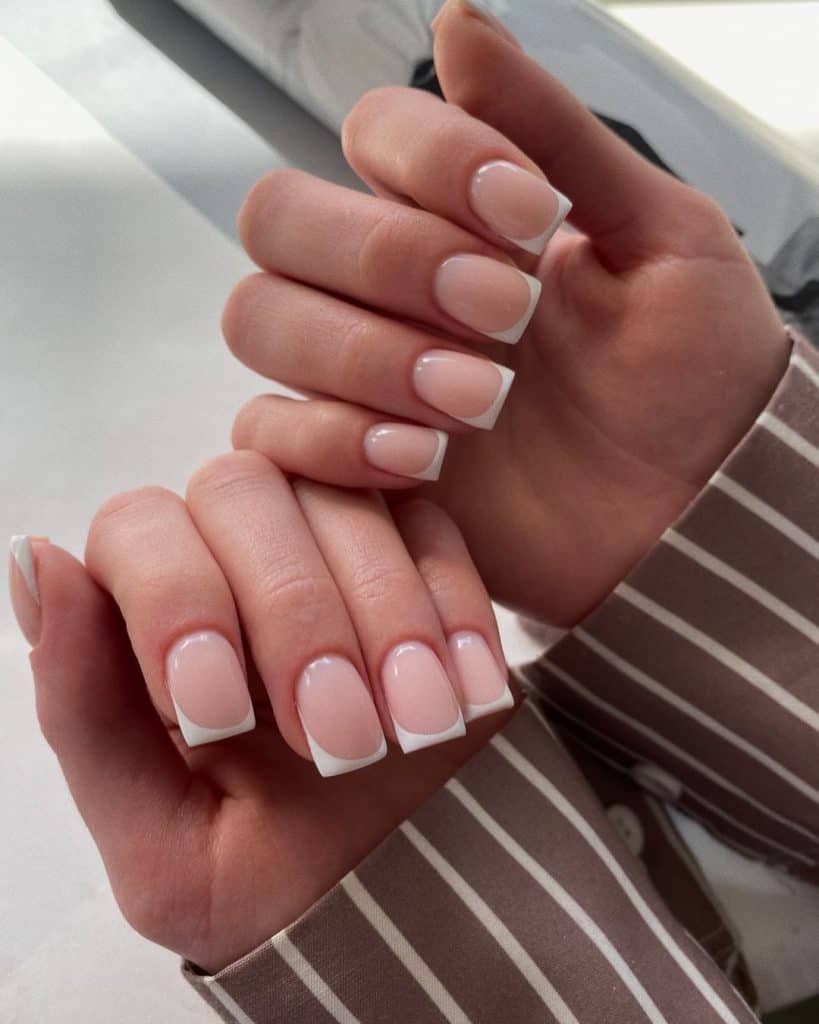
7. Classic French Manicure

Essentials
- Base coat: OPI Nail Envy
- Light pink polish: Essie Ballet Slippers
- White polish: OPI Alpine Snow
- Top coat: Seche Vite Dry Fast Top Coat
Step-by-Step Guide
- Start by applying a base coat to protect your nails and give them added strength.
- Apply two coats of the soft pink polish, making sure each coat dries completely before moving on.
- Using a striping brush or French manicure guides, paint the white tips, keeping them neat and even.
- Seal the design with a top coat to add a glossy finish and lock in the look.
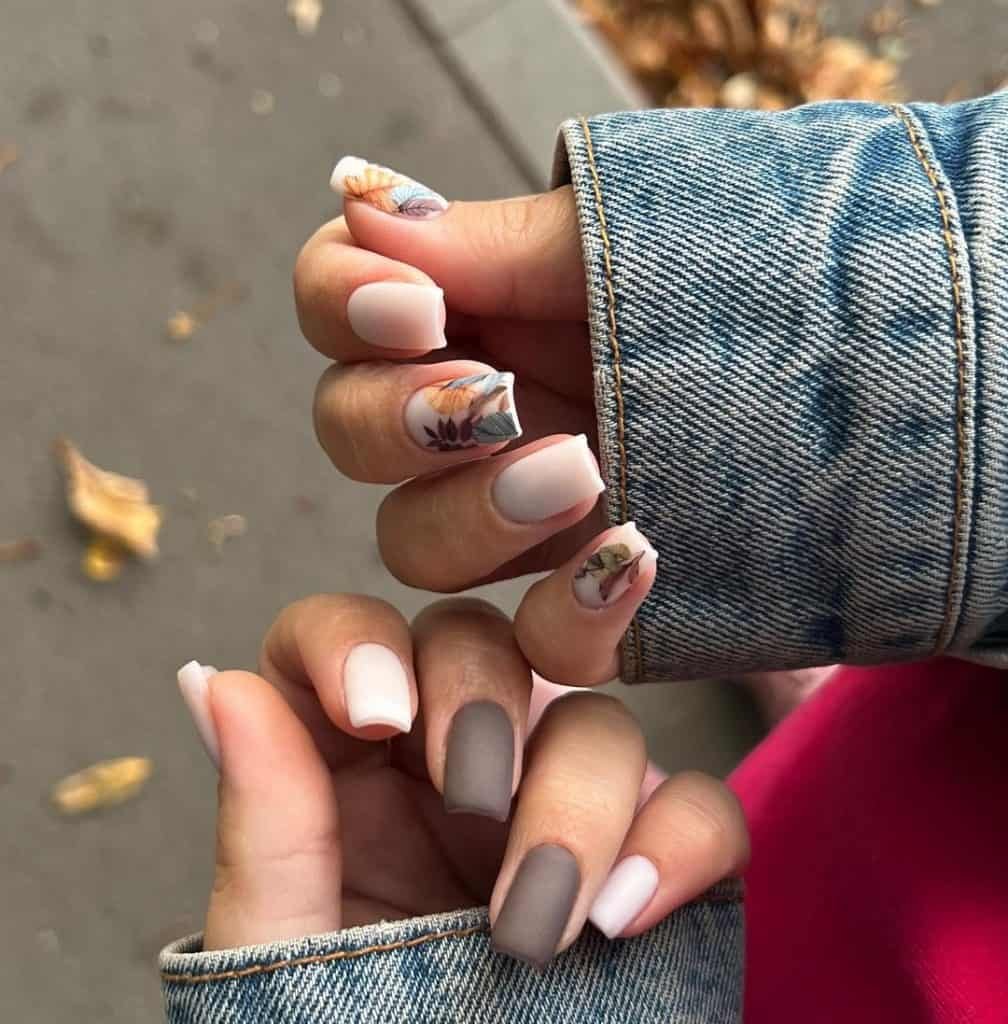
6. Autumnal Matte and Floral Accents

Supplies Needed
- Base coat: Sally Hansen “Complete Care”
- Matte top coat: OPI Matte Top Coat
- Brown polish: Essie “Chinchilly”
- Soft pink polish: OPI “Mod About You”
- Floral nail decals: Botanical Nail Art Stickers
- Top coat: Essie “Good to Go” Top Coat
How to Create This Nail Look
- Start by applying a base coat to protect your nails and help the polish stick better.
- Alternate between the brown and pink polishes on each nail, creating a mix of colors.
- Add the floral decals to a few accent nails, placing them carefully for a balanced look.
- Finish with a matte top coat for a smooth, velvety finish.
5. Geode-Inspired Nail Art

Supplies Needed
- Base coat: Deborah Lippmann Gel Lab Pro Base Coat
- Nude polish: Essie “Topless & Barefoot”
- Metallic silver polish: OPI “Turn On The Northern Lights!”
- Deep green polish: Zoya “Hunter”
- Top coat: Butter London Hardwear Shine UV Topcoat
Step-by-Step Process
- Begin by applying a base coat to shield your nails and create an even foundation for the polish.
- Next, apply two layers of the nude polish, making sure to let each layer dry completely.
- With a fine brush, add the metallic silver and green polishes in patterns that resemble the natural look of a geode.
- Finally, apply a top coat to seal your design and give it a glossy finish.
4. Bold Blue with Daisy Accent

Materials
- Base coat: Orly Bonder
- Blue polish: Essie “Butler Please”
- White polish: OPI “Alpine Snow”
- Yellow polish: Sally Hansen “Mellow Yellow”
- Daisy nail decal: Floral Nail Art Stickers
- Top coat: Essie “Gel Setter”
How to Achieve the Look
- Begin by applying a base coat to protect your nails.
- Apply two layers of the blue polish, letting each coat dry completely.
- For the accent nail, either place the daisy decal or create the daisy design using a dotting tool along with the white and yellow polishes.
- Seal the look with a top coat for a glossy finish and to lock in the design.
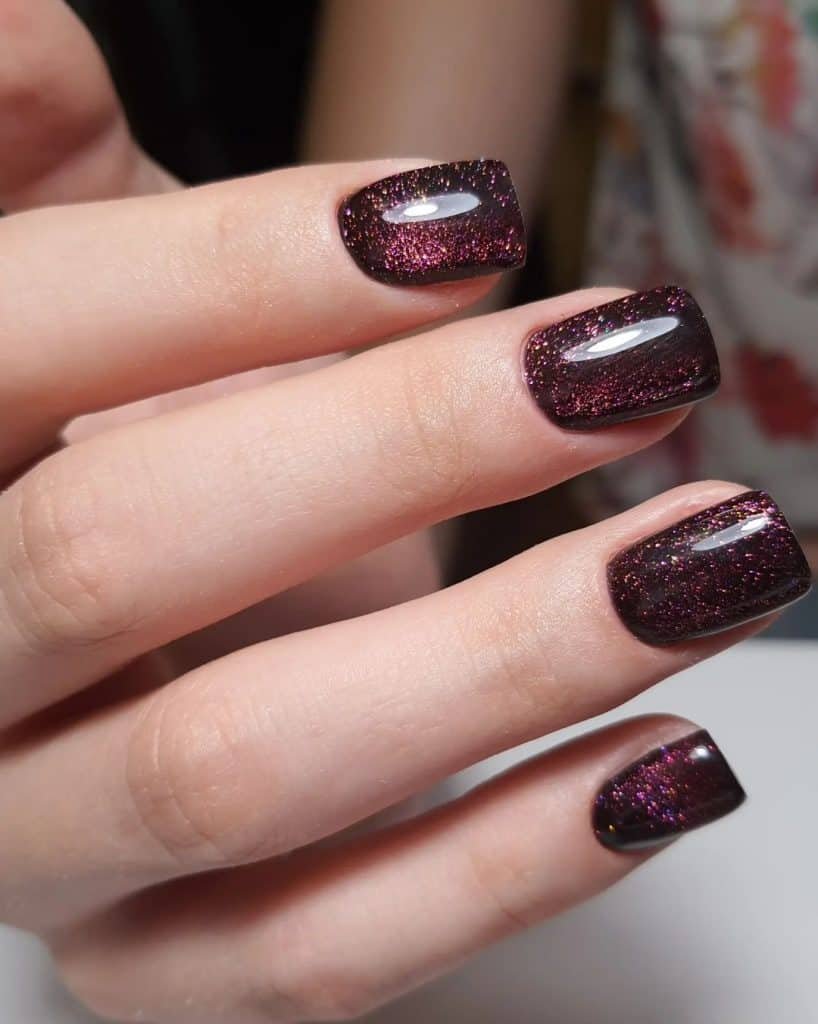
3. Deep Burgundy Glitter

Essentials
- Base coat: Zoya Anchor Basecoat
- Deep red polish: OPI “Malaga Wine”
- Red glitter polish: ILNP “Cabaret”
- Top coat: CND Vinylux Weekly Top Coat
Creating the Style
- Start by applying a base coat to protect your nails and help the polish last longer.
- Next, paint your nails with the deep red polish, applying two coats for full coverage.
- Add a layer of the red glitter polish for some sparkle.
- Finish with a top coat to give your nails a glossy shine and make your manicure last.
2. Bold Red Gloss

Supplies Needed
- Base Coat: Orly Bonder Basecoat
- Red Polish: OPI “Big Apple Red”
- Top Coat: Essie “Gel Setter” Top Coat
Steps to Achieve the Look
- Start by applying a base coat to protect your nails and help the polish stick better.
- Next, apply two layers of the red polish, making sure each one dries completely before moving on.
- Finish off with a top coat to give your nails a high-gloss shine and make your manicure last longer.
1. Pink Glitter Extravaganza

Supplies
- Base Coat: Sally Hansen “Double Duty”
- Pink Glitter Polish: ILNP “Birthday Suit”
- Top Coat: Seche Vite Dry Fast Top Coat
How to Achieve the Look
- Start by applying a base coat to protect your nails and create a smooth base.
- Next, layer on two to three coats of the pink glitter polish until you reach the coverage you want.
- Finish off with a top coat to lock in the glitter and give your nails a shiny, polished finish.
What are the trending colors for autumn acrylic nails?
This season, deep burgundy, burnt orange, olive green, and mustard yellow are popular choices. These shades capture the essence of fall and pair well with a variety of outfits. Neutral tones like taupe and warm browns also complement the seasonal transition, offering a versatile base for intricate designs.
Can I add autumn-themed art to my acrylic nails?
Yes, autumn-themed nail art is a great way to celebrate the season. Consider designs like fall leaves, pumpkins, plaid patterns, or even metallic accents like gold and copper. These details can be hand-painted or applied using nail stickers and decals for a polished finish.
What nail shape works best with fall acrylic nails?
Popular shapes for fall include almond, coffin, and square. Almond and coffin shapes offer a sleek, elongated look that suits bold fall colors, while square nails provide a classic base that can handle both simple and intricate designs. Choose a shape that complements your hand and the design you have in mind.
How often should I get a fill for my autumn acrylic nails?
To maintain the look and health of your acrylic nails, plan to get a fill every 2-3 weeks. This keeps your nails looking fresh and ensures they remain strong and intact as your natural nails grow. Regular fills also allow for any seasonal design updates you might want as fall progresses.

![21 Cute Fall Nail Designs [2024] for a Cozy Autumn Look 21 Cute Fall Nail Designs](https://exactlyhowlong.b-cdn.net/wp-content/uploads/2024/07/21-Cute-Fall-Nail-Designs-1280x720.jpg)

![21 Simple Cute Autumn Nails [2024] For A Cozy Seasonal Look 21 Simple Cute Autumn Nails](https://exactlyhowlong.b-cdn.net/wp-content/uploads/2024/07/21-Simple-Cute-Autumn-Nails-1280x720.jpg)
![21 Trending Autumn Nail Designs [2024] For a Cozy Fall Look 21 Trending Autumn Nail Designs](https://exactlyhowlong.b-cdn.net/wp-content/uploads/2024/07/21-Trending-Autumn-Nail-Designs-1280x720.jpg)

![21 Cute Earth Tone Nail Designs [2024] For A Chic, Natural Look 21 Cute Earth Tone Nail Designs](https://exactlyhowlong.b-cdn.net/wp-content/uploads/2024/07/21-Cute-Earth-Tone-Nail-Designs-1280x720.jpg)
![15 Best Fall Tablescapes [2024] for a Cozy Seasonal Gathering 15 Best Fall Tablescapes](https://exactlyhowlong.b-cdn.net/wp-content/uploads/2024/04/15-Best-Fall-Tablescapes-1280x720.jpg)


![21 Cozy Fall Crafts [2024] For A Chilly Autumn Evening 21 Cozy Fall Crafts](https://exactlyhowlong.b-cdn.net/wp-content/uploads/2024/03/21-Cozy-Fall-Crafts-1280x720.jpg)
![25 Simple Fall Snacks [2024] Perfect for Cozy Evenings 25 Simple Fall Snacks](https://exactlyhowlong.b-cdn.net/wp-content/uploads/2024/03/25-Simple-Fall-Snacks-1280x720.jpg)
![21 Easy Fall Finger Foods [2024] For A Cozy Autumn Gathering 21 Easy Fall Finger Foods](https://exactlyhowlong.b-cdn.net/wp-content/uploads/2024/03/21-Easy-Fall-Finger-Foods-1280x720.jpg)
![21 Easy Fall Mason Jar Crafts [2024] For Cozy Home Decor 21 Easy Fall Mason Jar Crafts](https://exactlyhowlong.b-cdn.net/wp-content/uploads/2024/04/21-Easy-Fall-Mason-Jar-Crafts-1280x720.jpg)
![11 Stunning Fall Living Room Decor Ideas [2024] to Embrace Cozy Autumn Vibes 11 Stunning Fall Living Room Decor Ideas](https://exactlyhowlong.b-cdn.net/wp-content/uploads/2024/04/11-Stunning-Fall-Living-Room-Decor-Ideas-1280x720.jpg)
![21 Cozy Fall Home Decor Ideas [2024] To Warm Your Space 21 Cozy Fall Home Decor Ideas](https://exactlyhowlong.b-cdn.net/wp-content/uploads/2024/04/21-Cozy-Fall-Home-Decor-Ideas-1280x720.jpg)
![21 Charming Rustic Fall Decor Ideas [2024] For Cozy Autumn Evenings 21 Charming Rustic Fall Decor Ideas](https://exactlyhowlong.b-cdn.net/wp-content/uploads/2024/04/21-Charming-Rustic-Fall-Decor-Ideas-1280x720.jpg)
![15 Delicious Fall Appetizers [2024] Perfect for Cozy Gatherings 15 Delicious Fall Appetizers](https://exactlyhowlong.b-cdn.net/wp-content/uploads/2024/04/15-Delicious-Fall-Appetizers-1280x720.jpg)
![15 Best Farmhouse Fall Decor [2024] For A Cozy Autumn Home 15 Best Farmhouse Fall Decor](https://exactlyhowlong.b-cdn.net/wp-content/uploads/2024/04/15-Best-Farmhouse-Fall-Decor-1280x720.jpg)
![15 Best Fall Crockpot Recipes [2024] For Cozy Comfort Food 15 Best Fall Crockpot Recipes](https://exactlyhowlong.b-cdn.net/wp-content/uploads/2024/04/15-Best-Fall-Crockpot-Recipes-1280x720.jpg)
![21 Best Fall Salads [2024] For a Cozy and Healthy Season 21 Best Fall Salads](https://exactlyhowlong.b-cdn.net/wp-content/uploads/2024/04/21-Best-Fall-Salads-1280x720.jpg)