Snowman crafts are a delightful way to bring winter magic indoors and spark creativity. Whether you’re looking for DIY snowman crafts to enjoy with kids or elegant snowman-themed decorations for your home, this guide has you covered. From paper snowman crafts to easy snowman craft ideas for beginners, there’s a wide range of options to explore. Snowman crafts aren’t just fun—they’re also a wonderful way to celebrate the season with personalized, handmade touches.


If you’re a fan of holiday decor, snowman crafts are a must-try this winter. From building 3D snowman crafts with recycled materials to designing adorable snowman ornaments, there’s something for everyone. Kids will love making their own unique snowman crafts with items like cotton balls, paper plates, and popsicle sticks. Meanwhile, adults can take their creativity up a notch with more intricate snowman craft projects that double as charming holiday gifts or centerpieces.
Not only are snowman crafts easy to make, but they’re also perfect for all ages. Whether you’re planning a winter-themed party or simply looking for an engaging way to spend a snowy afternoon, snowman crafts are the ideal activity. Explore creative ideas like glittery snowman crafts, rustic snowman decorations, and even edible snowman crafts for an extra special twist. With endless inspiration, snowman crafts are sure to become a cherished tradition for every winter season.
1. Embrace Different Materials
Experiment with a variety of materials like fabric, paper, and recycled items. This not only enhances creativity but also teaches resourcefulness.
2. Incorporate Natural Elements
Use elements from nature such as twigs, pinecones, and leaves to add a unique and rustic touch to your snowman crafts. This can also make crafting more eco-friendly.
3. Use Multi-Purpose Tools
Invest in versatile tools that can be used for various crafting techniques. This not only saves money but also simplifies the crafting process.
Snowman Crafts for Kids and Adults
21. Snowmen Cards
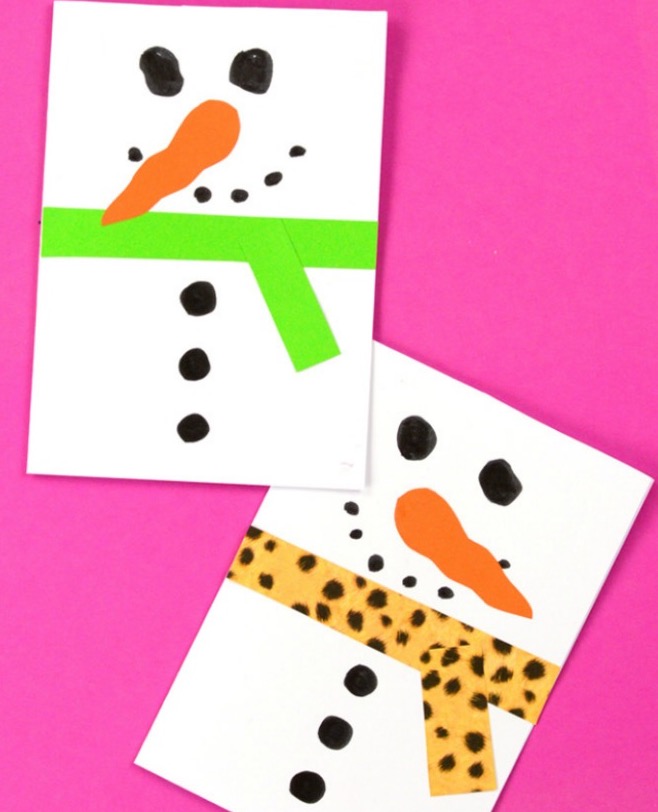
How to Make a Snowman Christmas Card
What You Need:
- Letter-sized or A4 paper (construction paper or blank card bases work)
- Scrap paper (variety of colors or ribbons)
- Orange paper or marker
- Black marker
- Scissors
- Glue
- Glitter (optional for festive accents)
Instructions:
- Fold an A4 or letter-sized sheet in half for a larger card, or cut a smaller sheet in half and fold.
- Cut a colorful strip of paper and glue it to the center of the card.
- Add another strip on top for a scarf effect, trimming excess paper.
- Use a black marker to draw eyes, a mouth, and buttons (or glue real buttons).
- Cut a carrot shape from orange paper or draw one with an orange marker.
- Add glitter for extra sparkle, and your snowman card is ready to send!
Get the tutorial (with detailed steps and images)
20. Snowmen Toilet Paper Roll

Get the tutorial (with detailed steps and images)
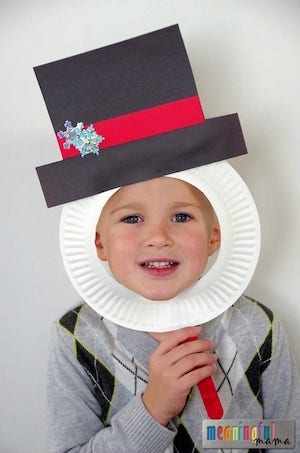
19. Paper Plate Masks
Get the tutorial (with detailed steps and images)
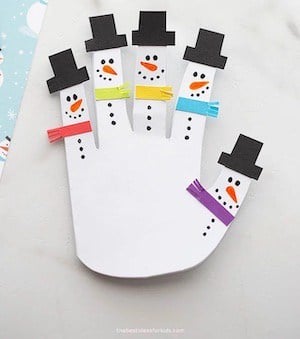
18. Snowman Handprint
Get the tutorial (with detailed steps and images)
17. Easy Paper Snowman
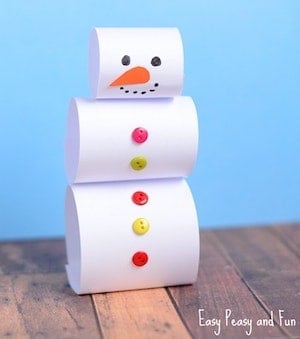
Simple Paper Snowman Craft
What you need:
- White paper
- Scissors
- Buttons (or pom-poms/paper, or a marker)
- Orange paper
- Glue
- Black marker
Instructions:
- Cut 3 strips of paper—two wide and one thinner.
- Roll the strips into paper tubes, starting with the widest, then making each subsequent roll smaller.
- Glue the rolls together, using clothespins for support while the glue sets.
- Decorate with buttons for the snowman’s body, draw the eyes and mouth, and glue on a paper carrot nose.
Get the tutorial (with detailed steps and images)
16. Countdown Calendar
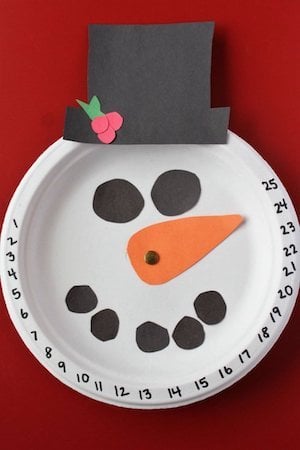
Get the tutorial (with detailed steps and images)
15. Cotton Ball Snowman
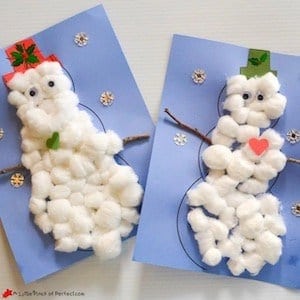
Get the tutorial (with detailed steps and images)
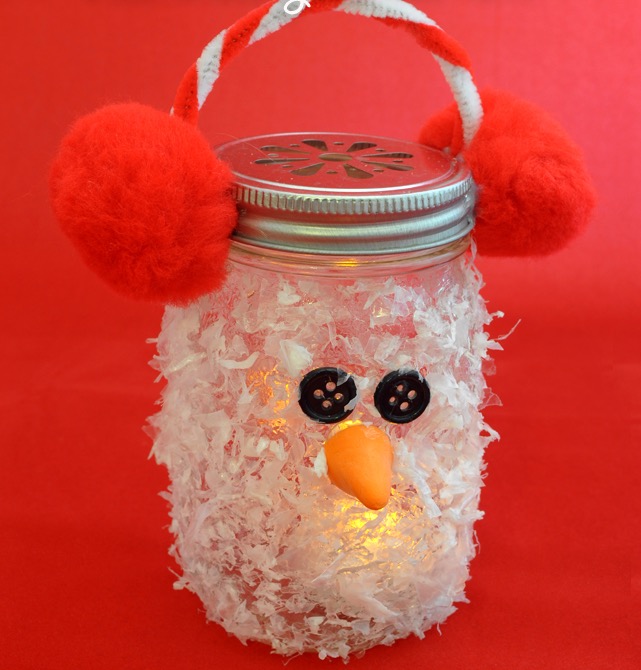
14. Snowman Mason Jar Luminary
Materials Needed:
- Frosty Snow® (or similar fluffy plastic material for crafting snow)
- Mason jars (regular or decorative)
- Red pom poms (large size)
- Red and white pipe cleaners
- Black buttons (for eyes)
- Orange air-dry clay (e.g., Model Magic)
- Glue gun and glue sticks
- Sponge brush
- Decorative mason jar lid (optional)
- Americana Decou-Page (or similar decoupage medium)
- Battery-operated candle light
- Plate (to catch excess Frosty Snow)
Instructions:
- Create the Snowman Face:
- Mold a carrot-shaped nose using orange air-dry clay.
- Attach the carrot nose and two black buttons (for eyes) to the front of the mason jar using a glue gun.
- Add the Snow Effect:
- Use a sponge brush to apply a thick coat of Decou-Page to the outside of the jar. A thicker coat ensures better adhesion for the snow material.
- Sprinkle a generous layer of Frosty Snow over the jar. Do this over a plate to catch the excess.
- Gently pat down the Frosty Snow with your hand to ensure even coverage.
- Let the jar dry completely.
- Make the Earmuffs:
- Cut a red and white pipe cleaner in half and twist the pieces together to create a candy cane pattern.
- Mold the twisted pipe cleaner into a “U” shape to fit the width of the mason jar lid.
- Using the glue gun, attach each end of the pipe cleaner to the outer edge of the mason jar lid.
- Glue a large red pom pom to each end of the pipe cleaner to complete the earmuffs.
- Assemble and Decorate:
- Place the earmuff-decorated lid on top of the dried mason jar.
- Insert a battery-operated candle light inside the jar to make it glow.
- Display Your Craft:
- Use as a holiday ornament on a sturdy tree branch or display along a fireplace mantel.
- Enjoy as festive holiday decor or a fun kids’ craft project!
Get the tutorial (with detailed steps and images)
13. Clothespin Snowmen
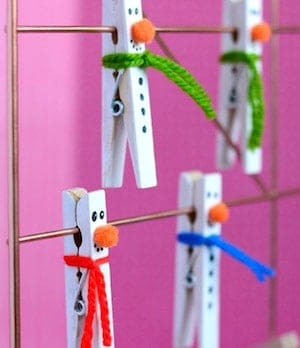
Get the tutorial (with detailed steps and images)
12. Sock Olaf
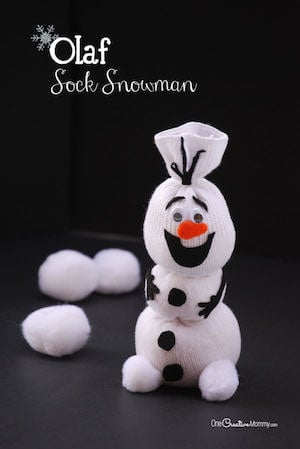
Create a fun and festive Olaf sock snowman for your next Frozen-themed party! This easy craft is perfect for kids and can be made in just a few steps. It’s a great hands-on activity that allows each guest to create their own Olaf!
Materials Needed:
- 1 bobby sock
- 1 ⅓ cups of rice (adjust for sock size)
- 2 small white pom-poms
- Orange felt (for nose)
- Large googly eyes
- Black adhesive felt
- 3 clear hair elastics
- Hot glue gun & glue
- Free Olaf features printable
Instructions:
- Fill the sock with rice to create Olaf’s body: a bit for the bottom, then the middle and head, securing each section with a hair elastic.
- Use hot glue to attach the sections and keep Olaf’s shape.
- Add the facial features, arms, and pom-pom feet.
- Attach the felt hair at the bottom of the head.
Get the tutorial (with detailed steps and images)
11. Tin Can Snowman
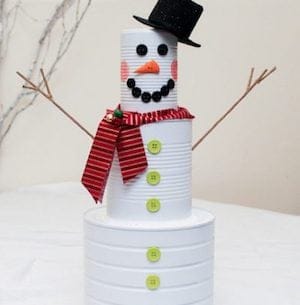
Create a charming snowman in under an hour with these simple materials:
- 3 empty tin cans (varied sizes)
- White and pink paint
- Buttons for eyes, nose, mouth, and body
- Twigs or floral wire for arms
- Black felt for the hat
- Christmas fabric for the scarf
- Hot glue and paintbrush
Steps:
- Paint the Cans: Spray or brush paint the cans white, covering the entire outside, including the bottoms.
- Create the Head: Use the smallest can as the head. Attach black buttons for the eyes, nose, and mouth with hot glue. Add pink cheeks above the mouth.
- Make the Arms: Use thick floral wire for arms. For fingers, cut the wire, reattach with glue, and shape them.
- Assemble the Body: Use the larger cans for the body (middle can for the upper body, largest for the lower body). Add buttons for decoration, drill holes for the arms, and glue them in place.
- Craft the Hat: Cut two circles of black felt (one for the brim, one smaller for the top) and a rectangle for the hat height. Use printer paper to form a ring, glue the felt pieces, and attach the hat to the snowman’s head.
- Finish: Stack the cans, attach the hat, and glue the scarf in place. Add embellishments like jingle bells, and your tin can snowman is ready to shine!
Get the tutorial (with detailed steps and images)
10. Character Candy Pots
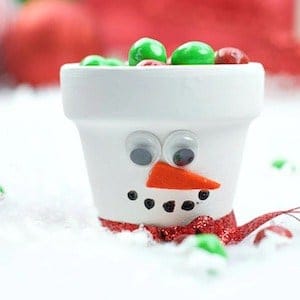
Christmas Kids’ Craft – Character Candy Pots
Supplies Needed:
- Mini flower pots
- Paint and brushes
- Googly eyes
- Pipe cleaners
- Felt
- Ribbon or embellishments
- Hot glue or craft glue
- Candy
Instructions:
Let kids get creative! My boys made everything from Santa hats to Pokemon characters. Start by painting the pot and letting it dry. Add embellishments, with adult help if using hot glue.
A couple of tips: Use painted felt for elf ears, or cotton balls/fur for Santa’s beard.
Get the tutorial (with detailed steps and images)
9. Snowman Door Hanger

Materials:
- 36-inch foam sheet or foam circles in 3 graduating sizes
- 3 black buttons
- Hot glue & glue gun
- Sharp knife
- Cotton balls or batting
- Yarn (color of your choice)
- Wired sisal vine (for arms)
- Twine (for hat)
- Faux carrot (for nose)
- Burlap ribbon
- Two hardback books (different sizes for hat)
Instructions:
Prepare Foam Circles:
- Use three plates of different sizes as guides to draw circles on the foam sheet.
- Cut out the circles with a sharp knife.
Add Cotton Filling:
- Apply hot glue in a spiral pattern on the foam circle’s center.
- Press cotton balls over the glued area to create a fuller appearance.
Wrap Yarn Around Foam:
- Hot glue one end of the yarn to the foam circle’s center.
- Wrap the yarn outward toward the edges, securing it with hot glue as needed.
- Wrap each foam circle twice for better coverage.
- Stack the circles and hot glue them together to form the snowman’s body.
Make the Arms:
- Cut two strips of wired sisal vine.
- Bend and twist them for strength.
- Push the arms into the foam and secure them with hot glue.
Create the Hat:
- Double and twist the twine for strength.
- Wrap the twine three times around a larger book to form the hat’s brim and eight or nine times around a smaller book for the top.
- Secure the twine loops with smaller pieces of wire.
- Slip the hat over the snowman’s head and hot glue the base into place.
Add the Nose:
- Cut a small diagonal piece off the end of the faux carrot.
- Hot glue it to the center of the snowman’s face.
Attach Buttons:
- Hot glue the buttons onto the snowman’s body.
Make the Hanger:
- Loop a small piece of twine and hot glue it to the back of the snowman’s head.
Add the Ribbon Scarf:
- Tie a burlap ribbon around the snowman’s neck.
- Trim the ribbon ends diagonally.
Get the tutorial (with detailed steps and images)
8. Reversible Scarecrow To Snowman Pallet

Materials Needed
- Pallet (or wood from a hardware store)
- Saw
- Hammer
- Nails
- Paint/Stain
- Paint brushes (foam brushes recommended)
- Paint pens
- Sealer (for outdoor use)
- Sandpaper
- Wired burlap ribbon
- Rattan or other decorative accents
- Sunflower or similar decoration
- Hot glue gun and glue sticks
Instructions
- Prepare the Wood
- If using a pallet, carefully remove the boards without breaking them. Watch out for nails.
- Cut 6 pieces of wood to your desired size. For example, 30″ long for the body and 25″ for the hat brim (optional for varying sizes).
- Assemble the Base
- Lay 4 pieces of wood side by side, touching each other.
- Place the 5th piece (hat brim) on top at an angle or as preferred, then nail it securely into place.
- Flip the wood over and repeat for the other side with the 6th piece for the hat brim.
- Stain and Paint the Scarecrow Side
- Stain the scarecrow’s hat and let it dry.
- Paint the face using vanilla paint. Allow it to dry completely.
- Add Scarecrow Features
- Draw the scarecrow’s eyes, nose, and mouth with a pencil first. Then, go over it with paint pens.
- Paint the Snowman Side
- Flip the wood and paint the snowman’s hat black and the face pure white.
- Repeat the steps from the scarecrow side to draw the snowman’s features. Let it dry completely.
- Seal the Decoration
- Apply an outdoor sealer to protect the decoration if you plan to use it outside.
- Decorate and Finish
- For the scarecrow: Create a bow using wired burlap ribbon, add rattan accents, and glue a sunflower to the center. Attach the bow with hot glue.
- For the snowman: Leave plain or add optional decorations like a bow or jingle bells.
Get the tutorial (with detailed steps and images)
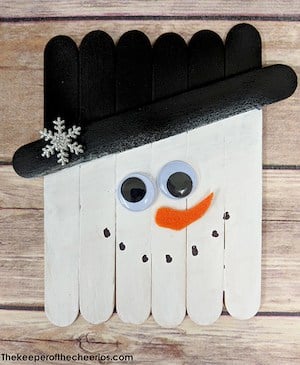
7. Popsicle Stick Snowmen

Snowflake Ornament Supplies:
- 3-5 craft sticks per snowflake
- White craft puffs
- White paint, paintbrush
- Fine silver glitter
- Elmer’s Early Learners Glue Pen
- String or magnet (optional)
Directions:
- Paint craft sticks white and let dry.
- Glue one stick on top of another in an X pattern. Repeat with more sticks, stacking and gluing as desired.
- Once dry, cover the front with a thin layer of glue and sprinkle with glitter. Let dry.
- Glue on craft puffs and allow to dry.
- Add a string or magnet for hanging.
Craft Stick Snowman Supplies:
- 1 large craft stick per snowman
- Washi tape, buttons
- White paint, paintbrush
- Orange scrapbook paper, black card stock
- Fine-tipped pencil
- Elmer’s Early Learners Glue Pen
- String or magnet (optional)
Directions:
- Paint the craft stick white. Add a washi tape “scarf” and glue buttons below it.
- Cut and glue a triangle from the orange paper for the nose and a hat from black paper.
- Draw eyes with a pencil.
- Attach a magnet or string for hanging.
Craft Stick Christmas Tree Supplies:
- 1 large craft stick
- 4 small craft sticks
- Green and brown acrylic paint
- Paintbrush, sequins, yellow button
- Glue
- String or magnet (optional)
Directions:
- Paint the large stick brown. Cut the small sticks to size and paint green. Let dry.
- Glue the green sticks in place on the brown stick.
- Add a yellow button for the star and sequins for ornaments.
- Attach a magnet or string for hanging.
Get the tutorial (with detailed steps and images)
6. Fence Picket Snowmen
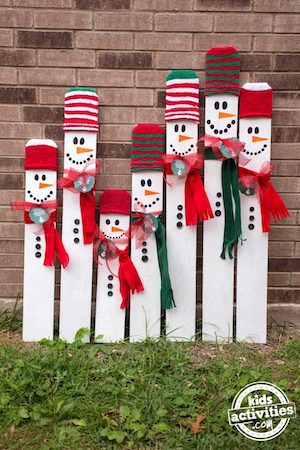
Looking for a meaningful gift for your child this Christmas? This snowman keepsake is perfect!
Materials:
- Wooden Fence Post
- White Paint
- Fuzzy Sock
- Felt
- Buttons
- Black & Orange Paint Pens
- Hot Glue Gun
Instructions:
- Measure your child and cut the fence post to their height. Sand and paint it white, adding coats as needed.
- Place a sock on top for the snowman’s hat, folding it like a beanie, and glue it in place.
- Use paint pens to draw the eyes, nose, and mouth.
- Tie and glue a felt scarf, cutting fringes at the ends.
- Glue buttons onto the snowman’s body.
Get the tutorial (with detailed steps and images)
5. Popsicle Stick Snowmen
These Christmas Craft Stick creations are fun, simple, and perfect for holiday parties or as tree ornaments!
Materials:
- Jumbo & regular craft sticks
- Craft paper
- Pom poms
- Wiggle eyes
- Buttons
- Chenille stems
- Ribbon
- Paint/markers
- Glue
- Scissors
Directions:
- Glue craft sticks together (see images).
- Let kids paint or color the sticks.
- Rudolph: Cut out antlers and a nose from craft paper, then glue on the nose, antlers, wiggle eyes, and a red pom pom nose.
- Snowman: Glue on wiggle eyes, a carrot nose, and a button mouth.
- Gingerbread Man: Paint a white squiggle for the outer edge and mouth. Add button cheeks, wiggle eyes, and a bow.
- Penguin: Glue on feet, a beak, and wiggle eyes. For earmuffs, attach two large pom poms with a chenille stem.
- Christmas Tree: Use a chenille stem for garland, pom poms for ornaments, and a star or snowflake on top.
Get the tutorial (with detailed steps and images)
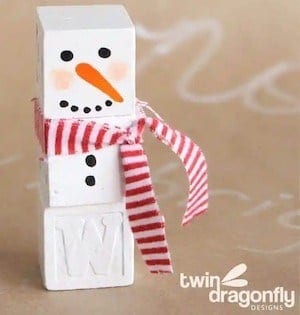
4. Wood Block Snowman
Supplies:
- Alphabet blocks
- Acrylic paint
- Paintbrush
- Scrap fabric
- Mod Podge
Start by gathering alphabet blocks—check around your house, a local thrift store, or even make your own from 2″x2″ wood blocks. Paint the blocks white with acrylic paint (at least three blocks per snowman).
Next, use acrylic paint to add a snowman face to one block and three black buttons to another. Seal the blocks with Mod Podge or a varnish for durability.
Alphabet Block Snowman: Stack the blocks and get creative! Add a scarf from scrap fabric, a top hat or toque, and even stick arms using hot glue. Personalize your snowman however you like. These cute snowmen are perfect for ornaments too!
Crafting Essentials for Kids:
- Apple Barrel Acrylic Paints for vibrant colors
- Paint brushes ideal for most craft surfaces
- All-in-one art supplies kit
- Rolling storage cart to keep craft supplies organized
Get the tutorial (with detailed steps and images)
3. Snowman
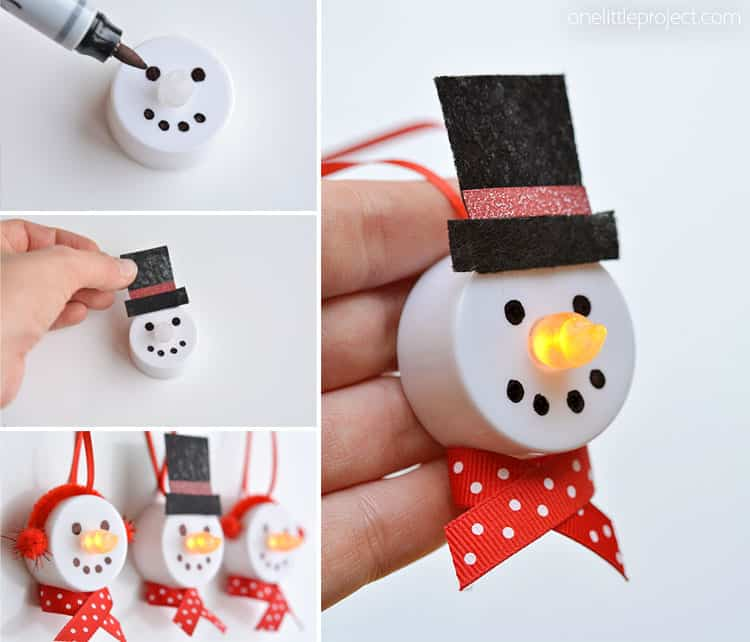
Create adorable snowman ornaments using budget-friendly supplies! Here’s what you’ll need:
- Battery-operated tea lights
- Black and orange Sharpies
- Red ribbon
- Red pipe cleaners
- Red pom poms
- Black felt
- Glue gun
- Draw a simple face with the black Sharpie. For the nose, color the tea light flame orange.
- Wrap the pipe cleaner around the tea light and glue the ends. Attach pom poms for ear muffs.
- Create a scarf by folding the ribbon and gluing it to the back.
- Optionally, make a top hat with black felt for a fun twist.
Get the tutorial (with detailed steps and images)
2. Snowman Hat Ornament
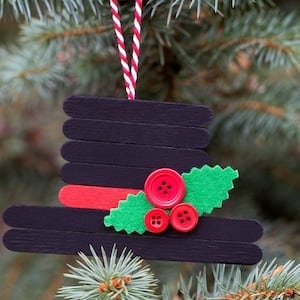
Kids will love making this DIY Popsicle Stick Snowman Hat Ornament for Christmas. It’s a simple and fun craft to add to your holiday decor!
Materials:
- 5 Miniature craft sticks
- 2 Standard craft sticks
- 3 Red buttons
- Green felt
- Pinking shears
- Craft glue or hot glue gun
- String
- Satin Mod Podge (optional)
- Red and Black acrylic paints
- Paintbrush
Instructions:
- Arrange 5 mini craft sticks for the hat’s top and 2 standard craft sticks for the bottom.
- Secure them with 2 mini craft sticks on top.
- Paint the top 4 mini sticks and bottom 2 black, and the bottom mini stick red.
- (Optional) Seal with Satin Mod Podge.
- Cut 2 leaves from green felt using pinking shears, then glue them to the hat.
- Attach 3 red buttons above the leaves.
- Glue a string loop to the back for hanging.
Get the tutorial (with detailed steps and images)
1. Fingerprint Salt Dough Ornament
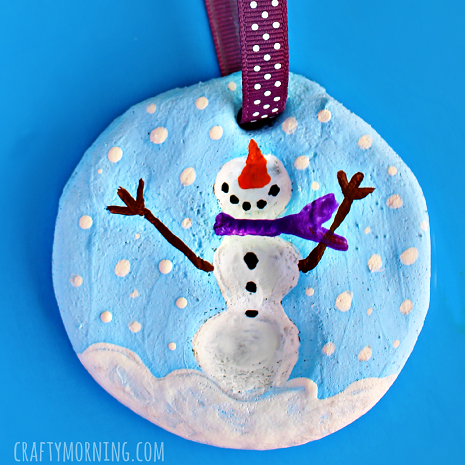
Create lasting memories with a DIY fingerprint snowman salt dough ornament! This fun and simple craft is perfect for kids of all ages. One batch makes about four ornaments, making it a great family activity.
Ingredients:
- 1 cup salt
- 1 cup flour (unbleached, all-purpose)
- ½ cup water
- Parchment paper or aluminum foil
- Straw/pen for punching hole
Instructions:
- Mix and knead the dough until firm.
- Roll out the dough and cut circles using a glass brim.
- Have kids press their fingers in three spots to form a snowman shape.
- Punch a hole at the top with a straw or pen.
- Bake at 200°F for 2-3 hours on parchment or foil.
- Once cool, paint the prints with blue and white acrylic paint, add details, and finish with a ribbon.
Get the tutorial (with detailed steps and images)
How can I make snowman crafts more engaging for adults?
To make snowman crafts more engaging for adults, consider using more advanced techniques and materials. Adults can create intricate snowman designs using sewing patterns, clay modeling, or even wood carving. Adding personalized touches, such as embellishments or thematic color schemes, can elevate the craft and make it suitable for home decor or gifting.
What materials are commonly used in snowman crafts for all ages?
Common materials used in snowman crafts include felt, fabric, buttons, googly eyes, pipe cleaners, and paint. For a more eco-friendly approach, recycled materials like bottle caps, old socks, and newspaper can be creatively repurposed to make unique snowman crafts. These materials allow for a wide range of creativity and adaptability for different skill levels.
Are there any eco-friendly snowman crafts available?
Yes, there are several eco-friendly snowman crafts you can make using recycled and sustainable materials. For example, you can create a snowman using old socks, fabric scraps, or cardboard tubes. Reusing items like plastic bottles, jar lids, and newspaper not only reduces waste but also adds a unique touch to each creation.
How can I adapt snowman crafts for a group activity or party?
Snowman crafts are perfect for group activities or parties by offering a variety of simple projects that accommodate different skill levels. Set up stations with materials for making snowman ornaments, hats, or gift tags, and provide step-by-step instructions. This allows participants to work at their own pace while enjoying a fun and collaborative crafting experience.
What are some snowman crafts suitable for gift-giving?
Snowman crafts that make great gifts include homemade snowman candles, decorative coasters, and snowman-themed mugs. You can personalize these crafts with names, dates, or special messages to create meaningful and cherished gifts. Homemade snowman cookies or bath bombs wrapped in festive packaging also make thoughtful gifts for friends and family.


