
As part of my “Will you be my bridesmaid?” box for Jared the Galleria of Jewelry, I made pretty paper flowers to cover the wooden box the bridesmaid’s gift was given in. These are completely inexpensive to make, they only require a few sheets of cardstock!
Paper Flower Tutorial
Our beautiful “Will you be my bridesmaid” box is decorated with pretty pale pink paper flowers. While they look immensely complicated and involved, I promise they’re not. It took a pair of scissors, a tiny bit of glue and about the length of a TV show to create about 4 of these beauties. This particular paper flower tutorial has a lot of pieces, but with a hot glue gun putting them together is pretty speedy.
This first block of steps is to make the petals and put them into the groupings that will make up the overall flowers when they are finished.
Materials:
- Pale pink cardstock
- Black cardstock
- Hot glue
- Printable petal templates
Step 1: Print and cut.
There are three sizes of flower petals (small, medium and large) in the free printable file; you’ll need all three to make all the flowers you see in this paper flower tutorial! We’ll be making two sizes of flower; the larger flower needs 6 large petals and 9 medium petals. The smaller flower needs 6 medium petals and 6 small petals.
The templates are designed to fill the page with as many petal shapes as they’ll hold, so count the number of flowers you’re going to make and print the files to your pale pink cardstock accordingly and cut them out.
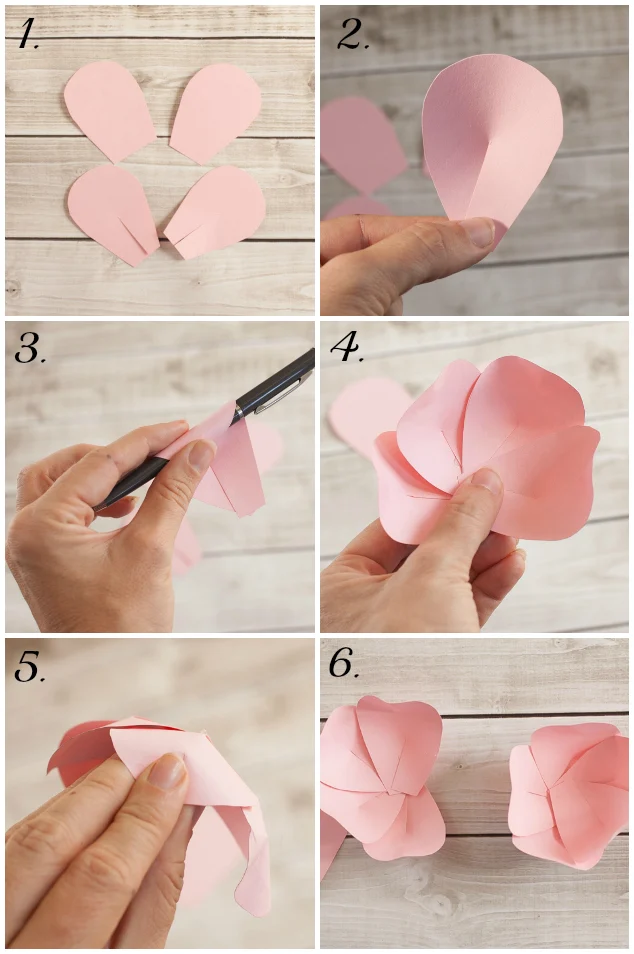
After you’ve gotten the shapes cut, you’ll need to made a snip from the bottom of the petals up the center to about the middle of the petal.
Step 2 and 3: Shaping the petal.
In picture 2, you can see where that slit that was cut up the middle of the petal is important! You’ll need to slide the right flap of the petal’s bottom over the left flap and glue it down. This gives the petal a curved shape.
Since I’m an impatient crafter, I used hot glue; if you use hot glue, be sure to use the tiniest amount possible when assembling your petals so it doesn’t add bulk to your final product. To make the petals look even a bit more natural, roll the top of the petal over a pen. I liked the way the flowers looked after I gave the rolled edge a little pinch with three fingers to place a divot in the petal edge.